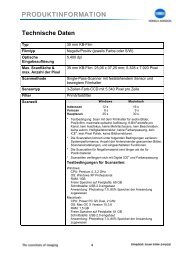
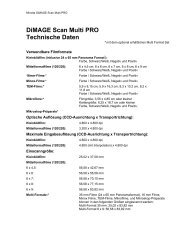
DiMAGE Scan Elite II Hardware OM - Konica Minolta Photo Imaging ...
DiMAGE Scan Elite II Hardware OM - Konica Minolta Photo Imaging ...
DiMAGE Scan Elite II Hardware OM - Konica Minolta Photo Imaging ...

You also want an ePaper? Increase the reach of your titles
YUMPU automatically turns print PDFs into web optimized ePapers that Google loves.
6 Adjust or move the Digital-GEM sample area to select the image area<br />
to be used to evaluate the Digital-GEM correction.<br />
• Choose a smooth uniform area to evaluate. Skin is a good subject.<br />
• Using the mouse, place the pointer over the corners or sides of the GEM sample area frame;<br />
the pointer will change to a double arrow. Simply click and drag the edge of the frame to<br />
adjust the area. By placing the pointer in the centre of the frame, the pointer will changed to<br />
a four-pointed arrow. Simply click and drag the entire frame over the image area. With the<br />
pointer outside the frame, click and drag to define a new sample area. To extend the area<br />
over the entire image, press control+A (Windows) or command+A (Macintosh).<br />
7 Click the apply Digital-GEM button to preview the Digital-GEM<br />
effect on the sample area.<br />
• Every time the Digital-GEM sample<br />
area is changed, or the degree of<br />
correction is adjusted, press the<br />
apply Digital-GEM button to view<br />
the results.<br />
• The Digital-GEM sample image can<br />
be magnified by clicking the fit-towindow<br />
button.<br />
8 Click the scan button<br />
to save the final image.<br />
Digital-GEM sample display<br />
• For the operation after performing the final scan, see page<br />
81.<br />
• The result with Digital GEM depends upon the condition of<br />
the film.<br />
• To turn off Digital GEM, click the Digital-GEM button again.<br />
Digital GEM off<br />
Digital GEM on<br />
STANDARD SCAN UTILITY<br />
73