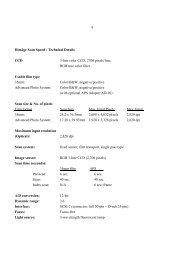
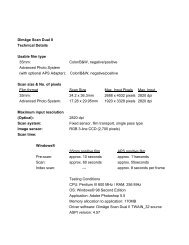
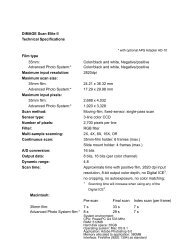
DiMAGE Scan Elite II Hardware OM - Konica Minolta Photo Imaging ...
DiMAGE Scan Elite II Hardware OM - Konica Minolta Photo Imaging ...
DiMAGE Scan Elite II Hardware OM - Konica Minolta Photo Imaging ...

You also want an ePaper? Increase the reach of your titles
YUMPU automatically turns print PDFs into web optimized ePapers that Google loves.
1 Turn on the computer to start the Mac OS.<br />
2 Insert the Adobe <strong>Photo</strong>shop Elements CD-R<strong>OM</strong> into the CD-R<strong>OM</strong><br />
drive.<br />
• The Adobe <strong>Photo</strong>shop Elements CD-R<strong>OM</strong> icon will appear on the desktop.<br />
3 Locate the <strong>Photo</strong>shop Elements installer in the Adobe <strong>Photo</strong>shop<br />
Elements folder located in the appropriate language folder.<br />
4 Double-click on the Install <strong>Photo</strong>shop ® Elements icon.<br />
5 The Adobe <strong>Photo</strong>shop Elements screen will appear.<br />
Click “Continue”.<br />
GETTING STARTED<br />
6 Use the drop-down menu to select the preferred<br />
language. Click “Continue”.<br />
7 The end-user license agreement will<br />
appear. If you accept the terms of the<br />
agreement, click “Accept” to continue the<br />
installation routine.<br />
• Read the entire agreement carefully before continuing<br />
the setup. If you do not agree to the terms, click<br />
“Decline” to exit the setup program.<br />
8 The read-me screen appears detailing<br />
product updates and documentation as<br />
well as troubleshooting tips. Click<br />
“Continue”.<br />
• This information can be printed using the “Print” button.<br />
9 At the bottom left of the installer screen,<br />
specify the location in which the software<br />
will be installed. To change the designated<br />
location, use the install-location menu; this<br />
menu can be used to select an existing<br />
location or create a new folder.<br />
17