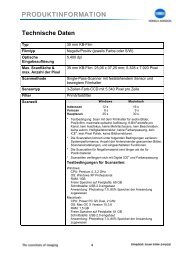
DiMAGE Scan Elite II Hardware OM - Konica Minolta Photo Imaging ...
DiMAGE Scan Elite II Hardware OM - Konica Minolta Photo Imaging ...
DiMAGE Scan Elite II Hardware OM - Konica Minolta Photo Imaging ...

You also want an ePaper? Increase the reach of your titles
YUMPU automatically turns print PDFs into web optimized ePapers that Google loves.
BRIGHTNESS & CONTRAST VARIATION<br />
Eight images with a slight correction to brightness<br />
and contrast are displayed around a thumbnail of the<br />
uncorrected prescan image.<br />
1 Drag the variation-step slider, or<br />
enter the correction step into the<br />
variation-step text box to set the<br />
degree of correction.<br />
• The initial setting is 10. The step can be set<br />
between 1 and 20.<br />
• Checking the display-limit check box will indicate<br />
when any of the image values exceed 0<br />
(black limit) or 255 (white limit) with the complementary<br />
colour. For example, if the white<br />
area of the image exceeds those values, the<br />
limit is displayed in the complementary colour,<br />
black.<br />
2 Click the best image among the eight frames.<br />
• The selected image becomes the new centre showing eight new images corrected by the<br />
designated step. This procedure can be repeated until the desired correction is obtained.<br />
• Click the reset button to cancel any changes.<br />
• Changes will be reflected in the prescan image.<br />
SATURATION VARIATION<br />
Two images with a slight saturation correction are<br />
displayed on each side of a thumbnail of the uncorrected<br />
prescan image.<br />
1 Drag the variation-step slider, or<br />
enter the correction step into the<br />
variation-step text box to set the<br />
degree of correction.<br />
• The initial setting is 10. The step can be set<br />
between 1 and 20.<br />
• Checking the display-limit check box will indicate<br />
when any of the image values exceed 0<br />
(black limit) or 255 (white limit) with the complementary<br />
colour.<br />
2 Click the best image among the two<br />
frames.<br />
• The selected image becomes the new centre showing two new images corrected by the designated<br />
step. This procedure can be repeated until the desired correction is obtained.<br />
• Click the reset button to cancel any changes.<br />
• Changes will be reflected in the prescan image.<br />
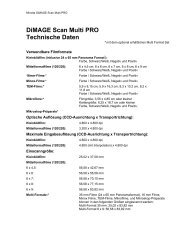
STANDARD SCAN UTILITY<br />
65