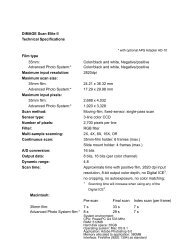
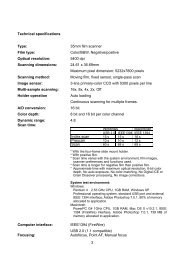
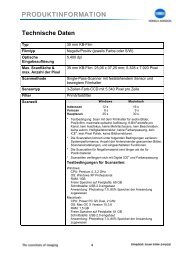
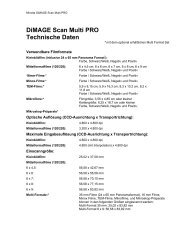
DiMAGE Scan Elite II Hardware OM - Konica Minolta Photo Imaging ...
DiMAGE Scan Elite II Hardware OM - Konica Minolta Photo Imaging ...
DiMAGE Scan Elite II Hardware OM - Konica Minolta Photo Imaging ...

You also want an ePaper? Increase the reach of your titles
YUMPU automatically turns print PDFs into web optimized ePapers that Google loves.
VARIATION CORRECTIONS<br />
The variation dialog box allows an image to be corrected by comparing it to other slightly corrected<br />
images surrounding it. This is an easy method to correct images for individuals who are inexperienced<br />
in image processing or photofinishing.<br />
1 Click the variation button .<br />
• The variation dialog box appears.<br />
2 Click the arrow next to the variation list<br />
box to select the image quality to be corrected:<br />
colour balance, brightness and<br />
contrast, or saturation.<br />
• Each variation shows the current prescan image in the<br />
centre with corrected sample images displayed around it.<br />
• Only the brightness and contrast variation can be used with B&W film.<br />
COLOUR BALANCE VARIATION<br />
Six images with a slight colour correction are displayed around a thumbnail of the uncorrected prescan<br />
image.<br />
1 Drag the variation-step slider, or<br />
enter the correction step into the<br />
variation-step text box to set the<br />
Display-limit check box<br />
degree of correction.<br />
• The initial setting is 10. The step can be set<br />
Variation-step text box<br />
between 1 and 20.<br />
• Checking the display-limit check box will indicate Variation-step slider<br />
when any of the image values exceed 0 (black<br />
limit) or 255 (white limit) with the complementary<br />
colour. For example, if any part of the blue<br />
channel image exceeds those values, the limit<br />
is displayed in the complementary colour, yellow.<br />
2 Click the best image among the six<br />
frames.<br />
• The selected image becomes the new centre<br />
showing six new images corrected by the designated<br />
step. This procedure can be repeated<br />
until the desired correction is obtained.<br />
• Click the reset button to cancel any changes.<br />
• Changes will be reflected in the prescan<br />
image.<br />
64