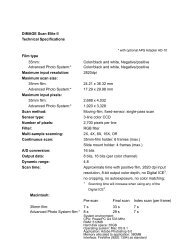
DiMAGE Scan Elite II Hardware OM - Konica Minolta Photo Imaging ...
DiMAGE Scan Elite II Hardware OM - Konica Minolta Photo Imaging ...
DiMAGE Scan Elite II Hardware OM - Konica Minolta Photo Imaging ...

You also want an ePaper? Increase the reach of your titles
YUMPU automatically turns print PDFs into web optimized ePapers that Google loves.
CUST<strong>OM</strong> WIZARD<br />
7 Enter scan setting. Click “Next”.<br />
• See page 74 for details on scan settings.<br />
• When the window opens, the last scan settings made<br />
will be displayed.<br />
• When auto-cropping function is active, blank space<br />
around the image area will be automatically eliminated.<br />
Inside-edge cropping crops the image just inside the<br />
image area. Outside-edge cropping crops the image to<br />
the outside limit of the image area. Inside-edge cropping<br />
is recommended for mounted slides.<br />
• The auto-cropping function will take priority over any<br />
scan settings entered.<br />
8 Select image-correction settings. Click<br />
“Next”.<br />
• Image corrections can be made by loading an image<br />
correction Job. See page 68 for details on image-correction<br />
Jobs.<br />
• The auto-setting functions automatically correct the<br />
scanned image. The tone curve and histogram setting<br />
improves colour and contrast. The brightness, contrast,<br />
and colour-balance setting improves contrast and<br />
brightness. The hue, saturation, and lightness setting<br />
improves the saturation of the colours. refer to the<br />
image-correction section on page 52 for details.<br />
9 Click “Save” to save the settings. Enter the<br />
file name in the save dialog box and click<br />
“OK”. Click “Start” to begin automatic<br />
scanning.<br />
• The next time the Custom Wizard is used, the settings<br />
can be selected in the Custom Wizard setting dialog<br />
box, see step 3.<br />
84