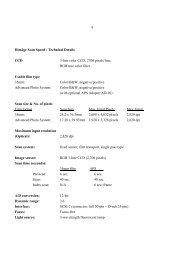
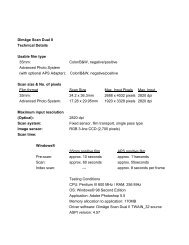
DiMAGE Scan Elite II Hardware OM - Konica Minolta Photo Imaging ...
DiMAGE Scan Elite II Hardware OM - Konica Minolta Photo Imaging ...
DiMAGE Scan Elite II Hardware OM - Konica Minolta Photo Imaging ...

Create successful ePaper yourself
Turn your PDF publications into a flip-book with our unique Google optimized e-Paper software.
Input-resolution list box ..................................................74, 77<br />
Input shadow/gamma/highlight slider.............................53, 60<br />
Input shadow/gamma/highlight text box .........................53, 60<br />
Input-size lock button .....................................................74, 77<br />
Input-size text box ..........................................................74, 77<br />
Inserting the film holder........................................................25<br />
Installed files and folders......................................................92<br />
Installing Adobe <strong>Photo</strong>shop Elements .................................14<br />
Installing the utility software ...................................................9<br />
Installing the plug-in .............................................................13<br />
J Job categories ......................................................................76<br />
Job-file list ............................................................................93<br />
Job-name list box .................................................................74<br />
JPEG ....................................................................................82<br />
L Launching the Easy <strong>Scan</strong> Utility...........................................22<br />
Launching the plug-in module ..............................................32<br />
Launching the Standard <strong>Scan</strong> Utility....................................31<br />
Launching the utility software (Macintosh) ...........................32<br />
Launching the utility software (Windows).............................31<br />
Load ICC-profile button ........................................................88<br />
Load image-correction-Job button ...........................37, 52, 68<br />
Load index-file button .....................................................37, 41<br />
Load Job button .......................................................74, 75, 80<br />
Loading the film holder.........................................................23<br />
Loading the scan Job file .....................................................75<br />
M Magnification text box.....................................................74, 77<br />
Main window.........................................................................33<br />
Manual cropping...................................................................44<br />
Manual-focus button .......................................................42, 50<br />
Monitor RGB.........................................................................89<br />
Multi-sample list box.............................................................35<br />
N NTSC....................................................................................89<br />
O Output colour space .............................................................89<br />
Output-resolution list box................................................74, 77<br />
Output shadow/highlight slider .......................................53, 60<br />
Output shadow/highlight text box ...................................53, 60<br />
Output-size lock button...................................................74, 77<br />
Output-size text box........................................................74, 77<br />
P PAL/SECAM .........................................................................89<br />
<strong>Photo</strong> CD (Job category)......................................................76<br />
<strong>Photo</strong>sensitive (Job category)..............................................76<br />
PICT .....................................................................................82<br />
Point-AF button...............................................................42, 49<br />
Power cable for AC-U10 .........................................................8<br />
Power switch.........................................................................19<br />
Preferences button .........................................................33, 34<br />
Prescan ..........................................................................42, 43<br />
Prescan button ...............................................................33, 43<br />
Prescan tab ..........................................................................42<br />
Prescanning the cropped image ..........................................45<br />
Q Quitting the Easy <strong>Scan</strong> Utility...............................................29<br />
Quitting the Standard <strong>Scan</strong> Utility ........................................85<br />
R Redo button....................................................................52, 67<br />
Redo a cancelled correction.................................................67<br />
Reset button (Tone-curve/Histogram tab) ............................53<br />
Reset button (<strong>Scan</strong> settings)................................................74<br />
Resolution and output size...................................................78<br />
Reverse-frame-order button ...........................................37, 40<br />
RGB and CMYK ...................................................................54<br />
RGB display ...................................................................42, 51<br />
Rotate-all-frames-180-degrees check box ...........................35<br />
Rotate-left button (Index scan).......................................37, 39<br />
Rotate-left button (Prescan) ...........................................42, 46<br />
Rotate-right button (Index scan).....................................37, 39<br />
Rotate-right button (Prescan).........................................42, 46<br />
S Saturation variation...............................................................65<br />
Save image-correction-Job button .................................52, 68<br />
Save index-image button................................................37, 40<br />
Save index-file button .....................................................37, 41<br />
Save Job button .............................................................74, 80<br />
Saving a Job file...................................................................80<br />
<strong>Scan</strong> button ....................................................................33, 81<br />
<strong>Scan</strong> settings........................................................................74<br />
<strong>Scan</strong>ning and saving an image (Easy <strong>Scan</strong> Utility) .............29<br />
Screen (Job category)..........................................................76<br />
Scrolling the image...............................................................47<br />
Selecting index thumbnails...................................................38<br />
Selective-colour button...................................................52, 66<br />
Setting monitor ICC profiles .................................................90<br />
Setting the film format and film type.....................................36<br />
Setting the output colour space............................................88<br />
Setting scanner preferences ................................................33<br />
Slide mount holder ...........................................................8, 24<br />
Smooth curve button ......................................................53, 55<br />
SMPTE-C .............................................................................89<br />
Snapshot button .............................................................52, 67<br />
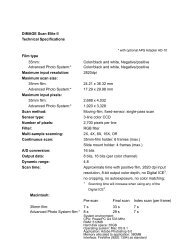
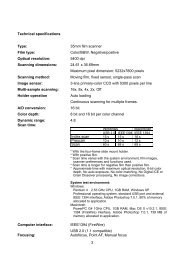
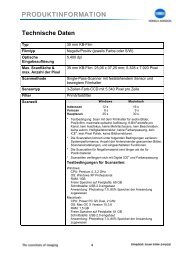
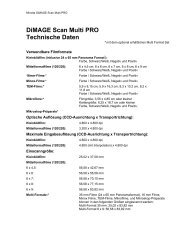
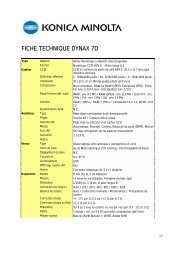
Specifications .......................................................................95<br />
Specifying Digital ICE, ROC, or GEM (Easy <strong>Scan</strong> Utility)....28<br />
Specifying the film type (Easy <strong>Scan</strong> Utility)..........................26<br />
Specifying the frame (Easy <strong>Scan</strong> Utility)..............................27<br />
Specifying the index-scan option (Easy <strong>Scan</strong> Utility)...........27<br />
Specifying the use of scanned images (Easy <strong>Scan</strong> Utility)..27<br />
sRGB....................................................................................89<br />
Standard <strong>Scan</strong> Utility............................................................30<br />
Status bar .............................................................................33<br />
T TIFF......................................................................................82<br />
Tone-curve/Histogram button .........................................52, 53<br />
Troubleshooting ....................................................................96<br />
U Undo button....................................................................52, 67<br />
Unit list box.....................................................................74, 78<br />
Unsharp-mask button.....................................................52, 66<br />
USB cable ..................................................................8, 20, 86<br />
USB port...............................................................................19<br />
Use-ICC-profile check box....................................................88<br />
User technical support .........................................................97<br />
V Variation button ..............................................................52, 64<br />
Variation-step text box ..........................................................64<br />
Variation-step slider..............................................................64<br />
W Web page (Job category).....................................................76<br />
White-point button ..........................................................53, 58<br />
Z Zoom button ...................................................................42, 47<br />
APPENDIX<br />
99