JLR-10 Instruction Manual.pdf - Echomaster Marine Ltd.
JLR-10 Instruction Manual.pdf - Echomaster Marine Ltd.
JLR-10 Instruction Manual.pdf - Echomaster Marine Ltd.

You also want an ePaper? Increase the reach of your titles
YUMPU automatically turns print PDFs into web optimized ePapers that Google loves.
<strong>JLR</strong>-<strong>10</strong> GPS Compass<br />
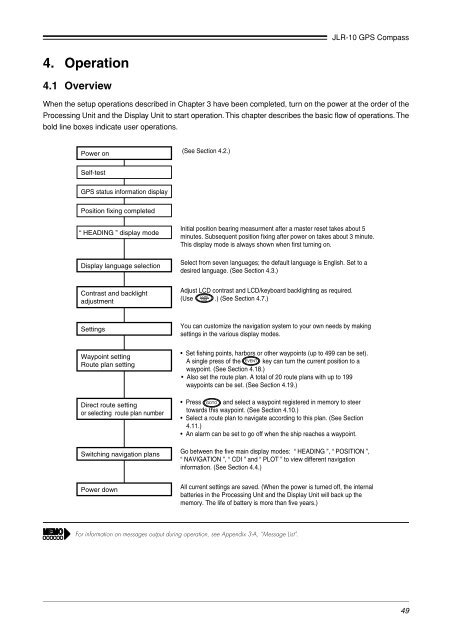
4. Operation<br />
4.1 Overview<br />
When the setup operations described in Chapter 3 have been completed, turn on the power at the order of the<br />
Processing Unit and the Display Unit to start operation. This chapter describes the basic flow of operations. The<br />
bold line boxes indicate user operations.<br />
Power on<br />
(See Section 4.2.)<br />
Self-test<br />
GPS status information display<br />
Position fixing completed<br />
“ HEADING ” display mode<br />
Display language selection<br />
Initial position bearing measurment after a master reset takes about 5<br />
minutes. Subsequent position fixing after power on takes about 3 minute.<br />
This display mode is always shown when first turning on.<br />
Select from seven languages; the default language is English. Set to a<br />
desired language. (See Section 4.3.)<br />
Contrast and backlight<br />
adjustment<br />
Adjust LCD contrast and LCD/keyboard backlighting as required.<br />
(Use .) (See Section 4.7.)<br />
Settings<br />
Waypoint setting<br />
Route plan setting<br />
Direct route setting<br />
or selecting route plan number<br />
Switching navigation plans<br />
Power down<br />
You can customize the navigation system to your own needs by making<br />
settings in the various display modes.<br />
• Set fishing points, harbors or other waypoints (up to 499 can be set).<br />
A single press of the key can turn the current position to a<br />
waypoint. (See Section 4.18.)<br />
• Also set the route plan. A total of 20 route plans with up to 199<br />
waypoints can be set. (See Section 4.19.)<br />
• Press and select a waypoint registered in memory to steer<br />
towards this waypoint. (See Section 4.<strong>10</strong>.)<br />
• Select a route plan to navigate according to this plan. (See Section<br />
4.11.)<br />
• An alarm can be set to go off when the ship reaches a waypoint.<br />
Go between the five main display modes: “ HEADING ”, “ POSITION ”,<br />
“ NAVIGATION ”, “ CDI ” and “ PLOT ” to view different navigation<br />
information. (See Section 4.4.)<br />
All current settings are saved. (When the power is turned off, the internal<br />
batteries in the Processing Unit and the Display Unit will back up the<br />
memory. The life of battery is more than five years.)<br />
For information on messages output during operation, see Appendix 3-A, “Message List”.<br />
49