JLR-10 Instruction Manual.pdf - Echomaster Marine Ltd.
JLR-10 Instruction Manual.pdf - Echomaster Marine Ltd.
JLR-10 Instruction Manual.pdf - Echomaster Marine Ltd.

Create successful ePaper yourself
Turn your PDF publications into a flip-book with our unique Google optimized e-Paper software.
<strong>JLR</strong>-<strong>10</strong> GPS Compass<br />
4.4 Switching between Main Display Modes<br />
This section describes how to switch between the Main display modes, then what screens can be selected from<br />
which main display mode. There are eight Main display modes. When the unit is turned on and GPS position<br />
fixing is performed, the “ HEADING ” display mode shows.<br />
• HEADING : Displays the true bearing of the bow and some navigation information<br />
• POSITION : Displays the current position and some navigation information<br />
• NAVIGATION : Displays bearing, distance, course deviation and other navigation information<br />
• CDI : Shows a graphic representation of course deviation from intended course to steer<br />
• PLOT : Shows a graphic representation of past track line and route lines<br />
• WAYPOINT : Mode for displaying and setting waypoints<br />
• ROUTE : Displays route plan numbers<br />
• STATUS S/F : Displays a variety of GPS satelite information including beacon information<br />
1. Switching between Main display modes<br />
The example given below shows how to switch from the “ HEADING ” display mode to the “ NAVIGATION ”<br />
display mode.<br />
(The numbers in the text correspond to numbers in the illustration.)<br />
q Press<br />
w Turn<br />
to display the “ Select Mode ” display mode.<br />
to select the “ NAVIGATION ” display mode. “ NAVIGATION ” is highlighted.<br />
e Press (Dial). (In descriptions given below, pressing will be used to mean pressing .)<br />
The “ NAVIGATION ” display mode appears.<br />
All eight main display modes can be displayed in the same manner.<br />
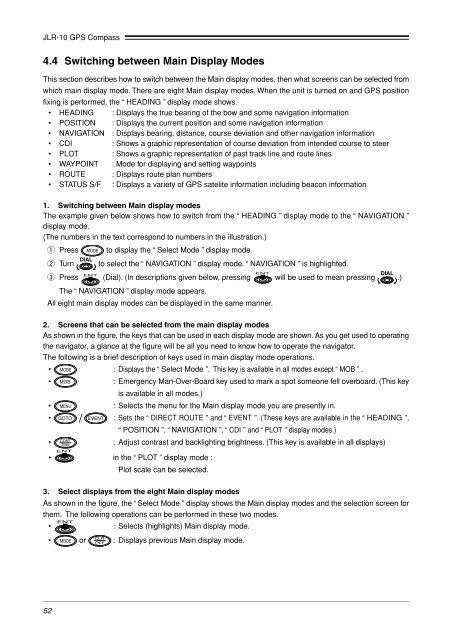
2. Screens that can be selected from the main display modes<br />
As shown in the figure, the keys that can be used in each display mode are shown. As you get used to operating<br />
the navigator, a glance at the figure will be all you need to know how to operate the navigator.<br />
The following is a brief description of keys used in main display mode operations.<br />
• : Displays the “ Select Mode ”. This key is available in all modes except “ MOB ” .<br />
• : Emergency Man-Over-Board key used to mark a spot someone fell overboard. (This key<br />
is available in all modes.)<br />
• : Selects the menu for the Main display mode you are presently in.<br />
• : Sets the “ DIRECT ROUTE ” and “ EVENT ”. (These keys are available in the “ HEADING ”,<br />
“ POSITION ”, “ NAVIGATION ”, “ CDI ” and “ PLOT ” display modes.)<br />
• : Adjust contrast and backlighting brightness. (This key is available in all displays)<br />
• in the “ PLOT ” display mode :<br />
Plot scale can be selected.<br />
3. Select displays from the eight Main display modes<br />
As shown in the figure, the “ Select Mode ” display shows the Main display modes and the selection screen for<br />
them. The following operations can be performed in these two modes.<br />
• : Selects (highlights) Main display mode.<br />
• or : Displays previous Main display mode.<br />
52