JLR-10 Instruction Manual.pdf - Echomaster Marine Ltd.
JLR-10 Instruction Manual.pdf - Echomaster Marine Ltd.
JLR-10 Instruction Manual.pdf - Echomaster Marine Ltd.

Create successful ePaper yourself
Turn your PDF publications into a flip-book with our unique Google optimized e-Paper software.
<strong>JLR</strong>-<strong>10</strong> GPS Compass<br />
(8) Turn to select values for [SET ARRIVAL DISTANCE] and press .<br />
Setting range: 0.00 to 9.99 nm<br />
The [Position] display mode is now displayed automatically.<br />
The alarm setting made in Section 4.9, “Setting Alarms (Arrival/Anchor/Off-course/DGPS)” are replaced by the arrival<br />
alarm distance made here.<br />
• The route plan numbers entered here are highlighted in the [Route] display mode.<br />
• An automatic step cannot be performed by selecting [Auto] in step (5) when [0.00] is set in [Set Arrival Distance]. To make an step,<br />
press , like in manual step, to step the waypoint.<br />
• When a value between 0.01 to 9.99 is entered, the alarm sounds when the vessel enters within the set arrival alarm zone from the<br />
waypoint.<br />
Auto step : Function that automatically steps from one waypoint to the next when the arrival perpedicular point has been<br />
passed.<br />
<strong>Manual</strong> step : The next waypoint is stepped by pressing . When is pressed as the vessel enters the set arrival<br />
alarm zone to step to the next waypoint, the alarm is canceled. If is not pressed to perform a step when the<br />
vessel enters the set arrival alarm zone, the alarm will ring until turned off by pressing . (<strong>Manual</strong> stepping<br />
is valid in “ HEADING ”, “ POSITION ”, “ NAVIGATION ” and “ CDI ” display modes.)<br />
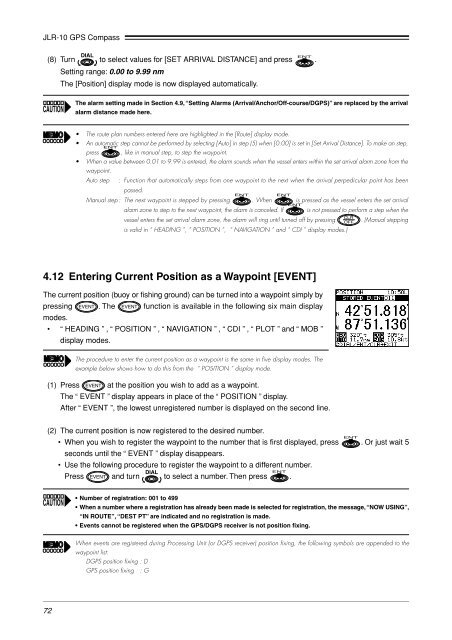
4.12 Entering Current Position as a Waypoint [EVENT]<br />
The current position (buoy or fishing ground) can be turned into a waypoint simply by<br />
pressing . The function is available in the following six main display<br />
modes.<br />
• “ HEADING ” , “ POSITION ” , “ NAVIGATION ” , “ CDI ” , “ PLOT ” and “ MOB ”<br />
display modes.<br />
The procedure to enter the current position as a waypoint is the same in five display modes. The<br />
example below shows how to do this from the “ POSITION ” display mode.<br />
(1) Press at the position you wish to add as a waypoint.<br />
The “ EVENT ” display appears in place of the “ POSITION ” display.<br />
After “ EVENT ”, the lowest unregistered number is displayed on the second line.<br />
(2) The current position is now registered to the desired number.<br />
• When you wish to register the waypoint to the number that is first displayed, press . Or just wait 5<br />
seconds until the “ EVENT ” display disappears.<br />
• Use the following procedure to register the waypoint to a different number.<br />
Press and turn to select a number. Then press .<br />
• Number of registration: 001 to 499<br />
• When a number where a registration has already been made is selected for registration, the message, “NOW USING”,<br />
“IN ROUTE”, “DEST PT” are indicated and no registration is made.<br />
• Events cannot be registered when the GPS/DGPS receiver is not position fixing.<br />
When events are registered during Processing Unit (or DGPS receiver) position fixing, the following symbols are appended to the<br />
waypoint list:<br />
DGPS position fixing : D<br />
GPS position fixing : G<br />
72