CETAC M-7600 Mercury Analyzer Operator's Manual
CETAC M-7600 Mercury Analyzer Operator's Manual
CETAC M-7600 Mercury Analyzer Operator's Manual

Create successful ePaper yourself
Turn your PDF publications into a flip-book with our unique Google optimized e-Paper software.
<strong>CETAC</strong> QuickTrace M-<strong>7600</strong> <strong>Mercury</strong> <strong>Analyzer</strong><br />
Chapter 3: Installing the <strong>Analyzer</strong><br />
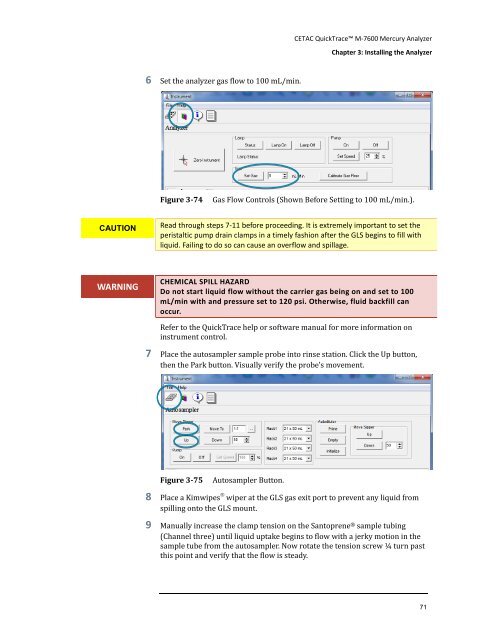
6 Set the analyzer gas flow to 100 mL/min.<br />
Figure 3-74<br />
Gas Flow Controls (Shown Before Setting to 100 mL/min.).<br />
CAUTION<br />
Read through steps 7-11 before proceeding. It is extremely important to set the<br />
peristaltic pump drain clamps in a timely fashion after the GLS begins to fill with<br />
liquid. Failing to do so can cause an overflow and spillage.<br />
WARNING<br />
CHEMICAL SPILL HAZARD<br />
Do not start liquid flow without the carrier gas being on and set to 100<br />
mL/min with and pressure set to 120 psi. Otherwise, fluid backfill can<br />
occur.<br />
Refer to the QuickTrace help or software manual for more information on<br />
instrument control.<br />
7 Place the autosampler sample probe into rinse station. Click the Up button,<br />
then the Park button. Visually verify the probe's movement.<br />
Figure 3-75<br />
Autosampler Button.<br />
8 Place a Kimwipes ® wiper at the GLS gas exit port to prevent any liquid from<br />
spilling onto the GLS mount.<br />
9 <strong>Manual</strong>ly increase the clamp tension on the Santoprene ® sample tubing<br />
(Channel three) until liquid uptake begins to flow with a jerky motion in the<br />
sample tube from the autosampler. Now rotate the tension screw ¼ turn past<br />
this point and verify that the flow is steady.<br />
71