

272144 Vanguard Twin Cylinder OHV BRIGGS & STRATTON.pdf
272144 Vanguard Twin Cylinder OHV BRIGGS & STRATTON.pdf
272144 Vanguard Twin Cylinder OHV BRIGGS & STRATTON.pdf

Create successful ePaper yourself
Turn your PDF publications into a flip-book with our unique Google optimized e-Paper software.
AIR CLEANER SERVICE<br />
WARNING<br />
Ì<br />
ÌÌ<br />
AVOID FIRES!<br />
• Never operate an engine with the air cleaner<br />
assembly or air cleaner cartridge removed!<br />
A properly serviced air cleaner protects internal engine<br />
parts from airborne dirt and dust particles. If air<br />
cleaner instructions are not followed, particles that<br />
should be collected in the air cleaner will pass into<br />
the engine. These particles are abrasive and will<br />
cause the piston rings and cylinder bore to wear<br />
quickly. As the rings and bore wear, the abrasive particles<br />
enter the crankcase and contaminate the oil,<br />
forming an abrasive mixture that will wear internal<br />
parts.<br />
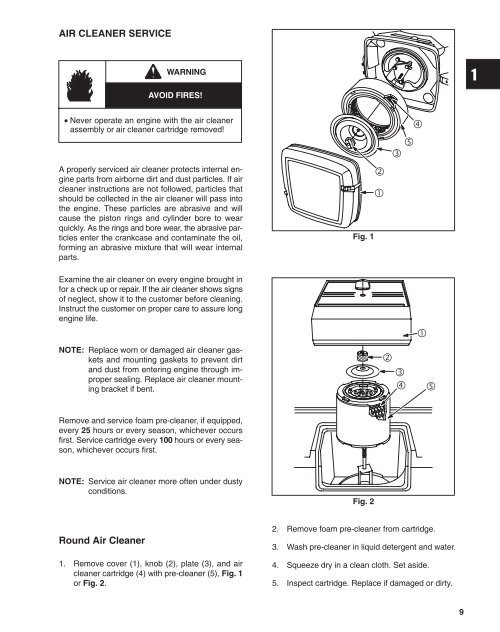
Fig. 1<br />
<br />
<br />
<br />
<br />
<br />
Examine the air cleaner on every engine brought in<br />
for a check up or repair. If the air cleaner shows signs<br />
of neglect, show it to the customer before cleaning.<br />
Instruct the customer on proper care to assure long<br />
engine life.<br />
ÌÌ<br />
ÌÌ<br />
<br />
NOTE: Replace worn or damaged air cleaner gaskets<br />
and mounting gaskets to prevent dirt<br />
and dust from entering engine through improper<br />
sealing. Replace air cleaner mounting<br />
bracket if bent.<br />
ÑÑ<br />
<br />
<br />
<br />
<br />
Remove and service foam pre-cleaner, if equipped,<br />
every 25 hours or every season, whichever occurs<br />
first. Service cartridge every 100 hours or every season,<br />
whichever occurs first.<br />
NOTE: Service air cleaner more often under dusty<br />
conditions.<br />
Fig. 2<br />
Round Air Cleaner<br />
1. Remove cover (1), knob (2), plate (3), and air<br />
cleaner cartridge (4) with pre-cleaner (5), Fig. 1<br />
or Fig. 2.<br />
2. Remove foam pre-cleaner from cartridge.<br />
3. Wash pre-cleaner in liquid detergent and water.<br />
4. Squeeze dry in a clean cloth. Set aside.<br />
5. Inspect cartridge. Replace if damaged or dirty.<br />
9


