

272144 Vanguard Twin Cylinder OHV BRIGGS & STRATTON.pdf
272144 Vanguard Twin Cylinder OHV BRIGGS & STRATTON.pdf
272144 Vanguard Twin Cylinder OHV BRIGGS & STRATTON.pdf

Create successful ePaper yourself
Turn your PDF publications into a flip-book with our unique Google optimized e-Paper software.
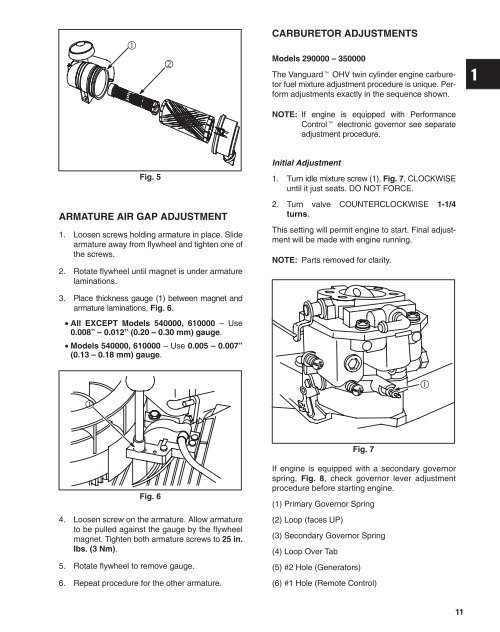
CARBURETOR ADJUSTMENTS<br />
Models 290000 – 350000<br />
The <strong>Vanguard</strong> <strong>OHV</strong> twin cylinder engine carburetor<br />
fuel mixture adjustment procedure is unique. Perform<br />
adjustments exactly in the sequence shown.<br />
NOTE: If engine is equipped with Performance<br />
Control electronic governor see separate<br />
adjustment procedure.<br />
Fig. 5<br />
ARMATURE AIR GAP ADJUSTMENT<br />
1. Loosen screws holding armature in place. Slide<br />
armature away from flywheel and tighten one of<br />
the screws.<br />
2. Rotate flywheel until magnet is under armature<br />
laminations.<br />
Initial Adjustment<br />
1. Turn idle mixture screw (1), Fig. 7, CLOCKWISE<br />
until it just seats. DO NOT FORCE.<br />
2. Turn valve COUNTERCLOCKWISE 1-1/4<br />
turns.<br />
This setting will permit engine to start. Final adjustment<br />
will be made with engine running.<br />
NOTE: Parts removed for clarity.<br />
3. Place thickness gauge (1) between magnet and<br />
armature laminations, Fig. 6.<br />
• All EXCEPT Models 540000, 610000 – Use<br />
0.008” – 0.012” (0.20 – 0.30 mm) gauge.<br />
• Models 540000, 610000 – Use 0.005 – 0.007”<br />
(0.13 – 0.18 mm) gauge.<br />
ÌÌ<br />
ÌÌ<br />
ÌÌ<br />
ÌÌ<br />
<br />
<br />
Fig. 7<br />
Fig. 6<br />
4. Loosen screw on the armature. Allow armature<br />
to be pulled against the gauge by the flywheel<br />
magnet. Tighten both armature screws to 25 in.<br />
lbs. (3 Nm).<br />
5. Rotate flywheel to remove gauge.<br />
6. Repeat procedure for the other armature.<br />
If engine is equipped with a secondary governor<br />
spring, Fig. 8, check governor lever adjustment<br />
procedure before starting engine.<br />
(1) Primary Governor Spring<br />
(2) Loop (faces UP)<br />
(3) Secondary Governor Spring<br />
(4) Loop Over Tab<br />
(5) #2 Hole (Generators)<br />
(6) #1 Hole (Remote Control)<br />
11


