

272144 Vanguard Twin Cylinder OHV BRIGGS & STRATTON.pdf
272144 Vanguard Twin Cylinder OHV BRIGGS & STRATTON.pdf
272144 Vanguard Twin Cylinder OHV BRIGGS & STRATTON.pdf

Create successful ePaper yourself
Turn your PDF publications into a flip-book with our unique Google optimized e-Paper software.
Replace Rope<br />
Remove Rope<br />
1. Pull rope out partially. Tie a temporary knot (4),<br />
Fig. 51.<br />
2. Remove insert (1) from rope handle (2). Pull<br />
knot out of rope insert.<br />
3. Untie knot. Remove insert and handle from<br />
rope.<br />
4. Pull rope (3) out as far as it will go.<br />
5. While holding rewind pulley, grasp knot with a<br />
pair of needle nose pliers and pull rope out of<br />
pulley.<br />
6. Slowly release spring tension on pulley until<br />
pulley stops turning.<br />
ÓÓÓ<br />
ÓÓÓ<br />
<br />
<br />
<br />
ÓÓÓÓ<br />
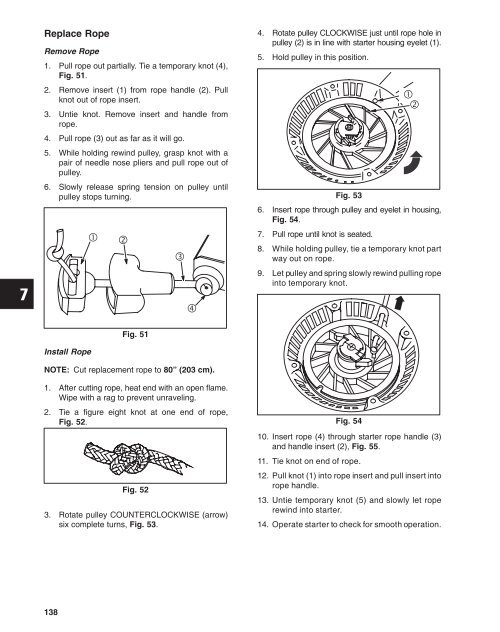
4. Rotate pulley CLOCKWISE just until rope hole in<br />
pulley (2) is in line with starter housing eyelet (1).<br />
5. Hold pulley in this position.<br />
Fig. 53<br />
<br />
<br />
6. Insert rope through pulley and eyelet in housing,<br />
Fig. 54.<br />
7. Pull rope until knot is seated.<br />
8. While holding pulley, tie a temporary knot part<br />
way out on rope.<br />
9. Let pulley and spring slowly rewind pulling rope<br />
into temporary knot.<br />
ÓÓÓ<br />
ÓÓÓÓ<br />
ÓÓÓÓ<br />
<br />
Fig. 51<br />
Install Rope<br />
NOTE: Cut replacement rope to 80” (203 cm).<br />
1. After cutting rope, heat end with an open flame.<br />
Wipe with a rag to prevent unraveling.<br />
2. Tie a figure eight knot at one end of rope,<br />
Fig. 52.<br />
Fig. 52<br />
3. Rotate pulley COUNTERCLOCKWISE (arrow)<br />
six complete turns, Fig. 53.<br />
Fig. 54<br />
10. Insert rope (4) through starter rope handle (3)<br />
and handle insert (2), Fig. 55.<br />
11. Tie knot on end of rope.<br />
12. Pull knot (1) into rope insert and pull insert into<br />
rope handle.<br />
13. Untie temporary knot (5) and slowly let rope<br />
rewind into starter.<br />
14. Operate starter to check for smooth operation.<br />
138


