
You also want an ePaper? Increase the reach of your titles
YUMPU automatically turns print PDFs into web optimized ePapers that Google loves.
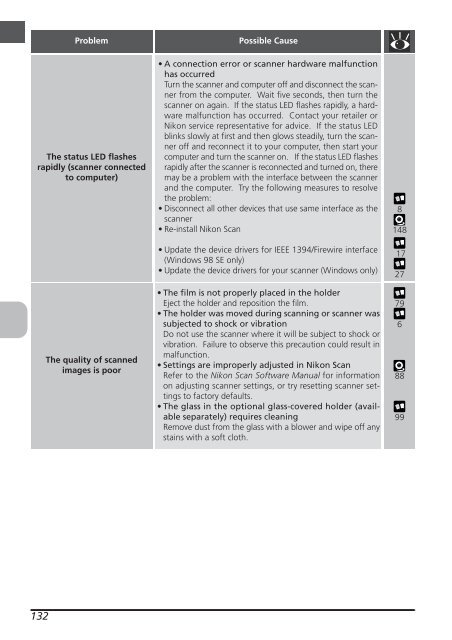
132<br />
Problem Possible Cause<br />
The status LED flashes<br />
rapidly (scanner connected<br />
to computer)<br />
The quality of scanned<br />
images is poor<br />
•A connection error or scanner hardware malfunction<br />
has occurred<br />
Turn the scanner and computer off and disconnect the scanner<br />
from the computer. Wait five seconds, then turn the<br />
scanner on again. If the status LED flashes rapidly, a hardware<br />
malfunction has occurred. Contact your retailer or<br />
<strong>Nikon</strong> service representative for advice. If the status LED<br />
blinks slowly at first and then glows steadily, turn the scanner<br />
off and reconnect it to your computer, then start your<br />
computer and turn the scanner on. If the status LED flashes<br />
rapidly after the scanner is reconnected and turned on, there<br />
may be a problem with the interface between the scanner<br />
and the computer. Try the following measures to resolve<br />
the problem:<br />
•Disconnect all other devices that use same interface as the<br />
scanner<br />
• Re-install <strong>Nikon</strong> Scan<br />
•Update the device drivers for IEEE 1394/Firewire interface<br />
(Windows 98 SE only)<br />
• Update the device drivers for your scanner (Windows only)<br />
•The film is not properly placed in the holder<br />
Eject the holder and reposition the film.<br />
• The holder was moved during scanning or scanner was<br />
subjected to shock or vibration<br />
Do not use the scanner where it will be subject to shock or<br />
vibration. Failure to observe this precaution could result in<br />
malfunction.<br />
• Settings are improperly adjusted in <strong>Nikon</strong> Scan<br />
Refer to the <strong>Nikon</strong> Scan Software <strong>Manual</strong> for information<br />
on adjusting scanner settings, or try resetting scanner settings<br />
to factory defaults.<br />
• The glass in the optional glass-covered holder (available<br />
separately) requires cleaning<br />
Remove dust from the glass with a blower and wipe off any<br />
stains with a soft cloth.<br />
8<br />
148<br />
17<br />
27<br />
79<br />
6<br />
88<br />
99