
You also want an ePaper? Increase the reach of your titles
YUMPU automatically turns print PDFs into web optimized ePapers that Google loves.
7<br />
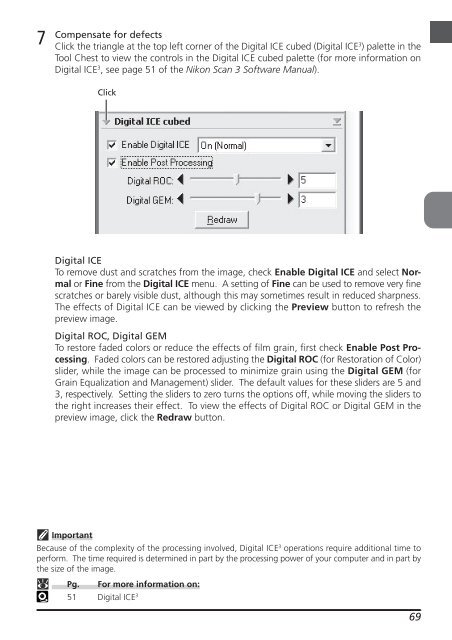
Compensate for defects<br />
Click the triangle at the top left corner of the Digital ICE cubed (Digital ICE 3 ) palette in the<br />
Tool Chest to view the controls in the Digital ICE cubed palette (for more information on<br />
Digital ICE 3 , see page 51 of the <strong>Nikon</strong> Scan 3 Software <strong>Manual</strong>).<br />
Click<br />
Digital ICE<br />
To remove dust and scratches from the image, check Enable Digital ICE and select Normal<br />
or Fine from the Digital ICE menu. A setting of Fine can be used to remove very fine<br />
scratches or barely visible dust, although this may sometimes result in reduced sharpness.<br />
The effects of Digital ICE can be viewed by clicking the Preview button to refresh the<br />
preview image.<br />
Digital ROC, Digital GEM<br />
To restore faded colors or reduce the effects of film grain, first check Enable Post Processing.<br />
Faded colors can be restored adjusting the Digital ROC (for Restoration of Color)<br />
slider, while the image can be processed to minimize grain using the Digital GEM (for<br />
Grain Equalization and Management) slider. The default values for these sliders are 5 and<br />
3, respectively. Setting the sliders to zero turns the options off, while moving the sliders to<br />
the right increases their effect. To view the effects of Digital ROC or Digital GEM in the<br />
preview image, click the Redraw button.<br />
Important<br />
Because of the complexity of the processing involved, Digital ICE3 operations require additional time to<br />
perform. The time required is determined in part by the processing power of your computer and in part by<br />
the size of the image.<br />
Pg. For more information on:<br />
51 Digital ICE3 69