

7918KB - Yamaha
7918KB - Yamaha
7918KB - Yamaha

You also want an ePaper? Increase the reach of your titles
YUMPU automatically turns print PDFs into web optimized ePapers that Google loves.
,,,,,,,,,,,,,,,<br />
QQQQQQQQQQQQQQQ<br />
¢¢¢¢¢¢¢¢¢¢¢¢¢¢¢<br />
Digital Effects<br />
,,,,,,,,,,,,,,,<br />
QQQQQQQQQQQQQQQ<br />
¢¢¢¢¢¢¢¢¢¢¢¢¢¢¢<br />
Reverb<br />
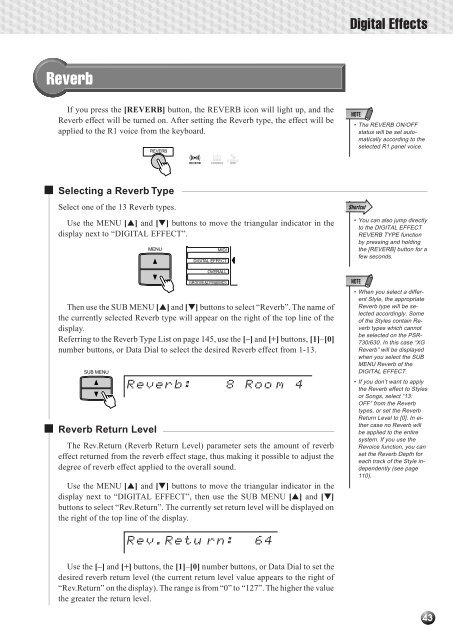
If you press the [REVERB] button, the REVERB icon will light up, and the<br />
Reverb effect will be turned on. After setting the Reverb type, the effect will be<br />
applied to the R1 voice from the keyboard.<br />
■ Selecting a Reverb Type<br />
Select one of the 13 Reverb types.<br />
Use the MENU [▲] and [▼] buttons to move the triangular indicator in the<br />
display next to “DIGITAL EFFECT”.<br />
Then use the SUB MENU [▲] and [▼] buttons to select “Reverb”. The name of<br />
the currently selected Reverb type will appear on the right of the top line of the<br />
display.<br />
Referring to the Reverb Type List on page 145, use the [–] and [+] buttons, [1]–[0]<br />
number buttons, or Data Dial to select the desired Reverb effect from 1-13.<br />
SUB MENU<br />
■ Reverb Return Level<br />
REVERB<br />
VARIATION<br />
REVERB CHORUS DSP<br />
MENU MIDI<br />
DIGITAL EFFECT<br />
OVERALL<br />
GROOVE&DYNAMICS<br />
Reverb: 8 Roo m 4<br />
The Rev.Return (Reverb Return Level) parameter sets the amount of reverb<br />
effect returned from the reverb effect stage, thus making it possible to adjust the<br />
degree of reverb effect applied to the overall sound.<br />
Use the MENU [▲] and [▼] buttons to move the triangular indicator in the<br />
display next to “DIGITAL EFFECT”, then use the SUB MENU [▲] and [▼]<br />
buttons to select “Rev.Return”. The currently set return level will be displayed on<br />
the right of the top line of the display.<br />
Rev.Retu<br />
rn: 64<br />
Use the [–] and [+] buttons, the [1]–[0] number buttons, or Data Dial to set the<br />
desired reverb return level (the current return level value appears to the right of<br />
“Rev.Return” on the display). The range is from “0” to “127”. The higher the value<br />
the greater the return level.<br />
• The REVERB ON/OFF<br />
status will be set automatically<br />
according to the<br />
selected R1 panel voice.<br />
• You can also jump directly<br />
to the DIGITAL EFFECT<br />
REVERB TYPE function<br />
by pressing and holding<br />
the [REVERB] button for a<br />
few seconds.<br />
• When you select a different<br />
Style, the appropriate<br />
Reverb type will be selected<br />
accordingly. Some<br />
of the Styles contain Reverb<br />
types which cannot<br />
be selected on the PSR-<br />
730/630. In this case “XG<br />
Reverb” will be displayed<br />
when you select the SUB<br />
MENU Reverb of the<br />
DIGITAL EFFECT.<br />
• If you don’t want to apply<br />
the Reverb effect to Styles<br />
or Songs, select “13:<br />
OFF” from the Reverb<br />
types, or set the Reverb<br />
Return Level to [0]. In either<br />
case no Reverb will<br />
be applied to the entire<br />
system. If you use the<br />
Revoice function, you can<br />
set the Reverb Depth for<br />
each track of the Style independently<br />
(see page<br />
110).<br />
43


![Premere il pulsante [SONG] - Yamaha](https://img.yumpu.com/50419553/1/184x260/premere-il-pulsante-song-yamaha.jpg?quality=85)

