

7918KB - Yamaha
7918KB - Yamaha
7918KB - Yamaha

You also want an ePaper? Increase the reach of your titles
YUMPU automatically turns print PDFs into web optimized ePapers that Google loves.
,,,,,,,,,,,,,,,<br />
QQQQQQQQQQQQQQQ<br />
¢¢¢¢¢¢¢¢¢¢¢¢¢¢¢<br />
Disk Operations<br />
,,,,,,,,,,,,,,,<br />
QQQQQQQQQQQQQQQ<br />
¢¢¢¢¢¢¢¢¢¢¢¢¢¢¢<br />
Format<br />
Setting up commercially available floppy disks (3.5 inch, 2HD/2DD<br />
type) for use with the PSR-730/630 is called formatting<br />
Follow the steps below to format a disk.<br />
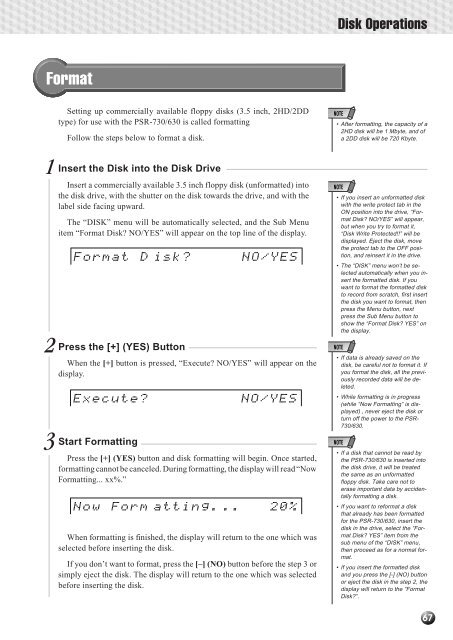
1 Insert the Disk into the Disk Drive<br />
Insert a commercially available 3.5 inch floppy disk (unformatted) into<br />
the disk drive, with the shutter on the disk towards the drive, and with the<br />
label side facing upward.<br />
The “DISK” menu will be automatically selected, and the Sub Menu<br />
item “Format Disk? NO/YES” will appear on the top line of the display.<br />
Format D<br />
isk?<br />
2Press the [+] (YES) Button<br />
NO/YES<br />
When the [+] button is pressed, “Execute? NO/YES” will appear on the<br />
display.<br />
Execute?<br />
isk?<br />
NO/YES<br />
3 Start Formatting<br />
Press the [+] (YES) button and disk formatting will begin. Once started,<br />
formatting cannot be canceled. During formatting, the display will read “Now<br />
Formatting... xx%.”<br />
Now Form atting. .. 20%<br />
When formatting is finished, the display will return to the one which was<br />
selected before inserting the disk.<br />
If you don’t want to format, press the [–] (NO) button before the step 3 or<br />
simply eject the disk. The display will return to the one which was selected<br />
before inserting the disk.<br />
• After formatting, the capacity of a<br />
2HD disk will be 1 Mbyte, and of<br />
a 2DD disk will be 720 Kbyte.<br />
• If you insert an unformatted disk<br />
with the write protect tab in the<br />
ON position into the drive, “Format<br />
Disk? NO/YES” will appear,<br />
but when you try to format it,<br />
“Disk Write Protected!!” will be<br />
displayed. Eject the disk, move<br />
the protect tab to the OFF position,<br />
and reinsert it in the drive.<br />
• The “DISK” menu won’t be selected<br />
automatically when you insert<br />
the formatted disk. If you<br />
want to format the formatted disk<br />
to record from scratch, first insert<br />
the disk you want to format, then<br />
press the Menu button, next<br />
press the Sub Menu button to<br />
show the “Format Disk? YES” on<br />
the display.<br />
• If data is already saved on the<br />
disk, be careful not to format it. If<br />
you format the disk, all the previously<br />
recorded data will be deleted.<br />
• While formatting is in progress<br />
(while “Now Formatting” is displayed)<br />
, never eject the disk or<br />
turn off the power to the PSR-<br />
730/630.<br />
• If a disk that cannot be read by<br />
the PSR-730/630 is inserted into<br />
the disk drive, it will be treated<br />
the same as an unformatted<br />
floppy disk. Take care not to<br />
erase important data by accidentally<br />
formatting a disk.<br />
• If you want to reformat a disk<br />
that already has been formatted<br />
for the PSR-730/630, insert the<br />
disk in the drive, select the “Format<br />
Disk? YES” item from the<br />
sub menu of the “DISK” menu,<br />
then proceed as for a normal format.<br />
• If you insert the formatted disk<br />
and you press the [-] (NO) button<br />
or eject the disk in the step 2, the<br />
display will return to the “Format<br />
Disk?”.<br />
67


![Premere il pulsante [SONG] - Yamaha](https://img.yumpu.com/50419553/1/184x260/premere-il-pulsante-song-yamaha.jpg?quality=85)

