MPLAB ICD 3 In-Circuit Debugger User's Guide
MPLAB ICD 3 In-Circuit Debugger User's Guide
MPLAB ICD 3 In-Circuit Debugger User's Guide
- No tags were found...

You also want an ePaper? Increase the reach of your titles
YUMPU automatically turns print PDFs into web optimized ePapers that Google loves.
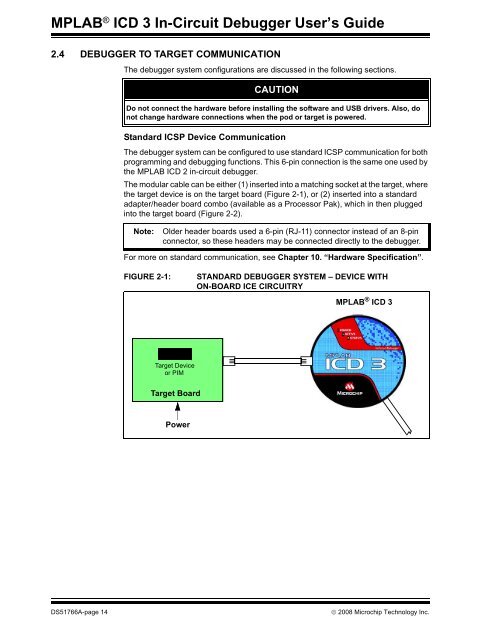
<strong>MPLAB</strong> ® <strong>ICD</strong> 3 <strong>In</strong>-<strong>Circuit</strong> <strong>Debugger</strong> User’s <strong>Guide</strong>2.4 DEBUGGER TO TARGET COMMUNICATIONThe debugger system configurations are discussed in the following sections.CAUTIONDo not connect the hardware before installing the software and USB drivers. Also, donot change hardware connections when the pod or target is powered.Standard ICSP Device CommunicationThe debugger system can be configured to use standard ICSP communication for bothprogramming and debugging functions. This 6-pin connection is the same one used bythe <strong>MPLAB</strong> <strong>ICD</strong> 2 in-circuit debugger.The modular cable can be either (1) inserted into a matching socket at the target, wherethe target device is on the target board (Figure 2-1), or (2) inserted into a standardadapter/header board combo (available as a Processor Pak), which in then pluggedinto the target board (Figure 2-2).Note:Older header boards used a 6-pin (RJ-11) connector instead of an 8-pinconnector, so these headers may be connected directly to the debugger.For more on standard communication, see Chapter 10. “Hardware Specification”.FIGURE 2-1:STANDARD DEBUGGER SYSTEM – DEVICE WITHON-BOARD ICE CIRCUITRY<strong>MPLAB</strong> ® <strong>ICD</strong> 3Target Deviceor PIMTarget BoardPowerDS51766A-page 14© 2008 Microchip Technology <strong>In</strong>c.