MPLAB ICD 3 In-Circuit Debugger User's Guide
MPLAB ICD 3 In-Circuit Debugger User's Guide
MPLAB ICD 3 In-Circuit Debugger User's Guide
- No tags were found...

You also want an ePaper? Increase the reach of your titles
YUMPU automatically turns print PDFs into web optimized ePapers that Google loves.
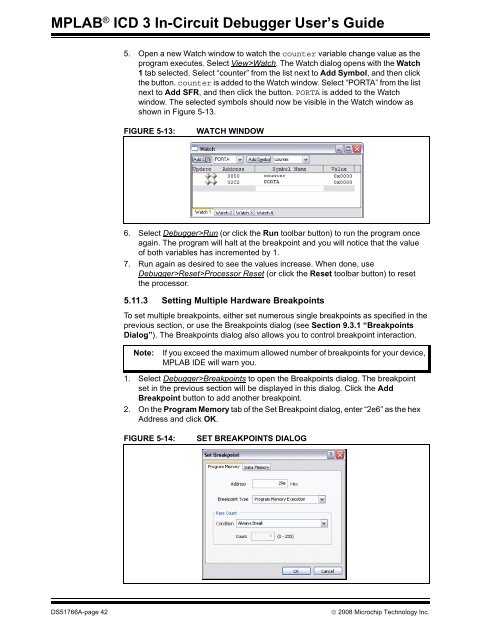
<strong>MPLAB</strong> ® <strong>ICD</strong> 3 <strong>In</strong>-<strong>Circuit</strong> <strong>Debugger</strong> User’s <strong>Guide</strong>5. Open a new Watch window to watch the counter variable change value as theprogram executes. Select View>Watch. The Watch dialog opens with the Watch1 tab selected. Select “counter” from the list next to Add Symbol, and then clickthe button. counter is added to the Watch window. Select “PORTA” from the listnext to Add SFR, and then click the button. PORTA is added to the Watchwindow. The selected symbols should now be visible in the Watch window asshown in Figure 5-13.FIGURE 5-13:WATCH WINDOW6. Select <strong>Debugger</strong>>Run (or click the Run toolbar button) to run the program onceagain. The program will halt at the breakpoint and you will notice that the valueof both variables has incremented by 1.7. Run again as desired to see the values increase. When done, use<strong>Debugger</strong>>Reset>Processor Reset (or click the Reset toolbar button) to resetthe processor.5.11.3 Setting Multiple Hardware BreakpointsTo set multiple breakpoints, either set numerous single breakpoints as specified in theprevious section, or use the Breakpoints dialog (see Section 9.3.1 “BreakpointsDialog”). The Breakpoints dialog also allows you to control breakpoint interaction.Note:If you exceed the maximum allowed number of breakpoints for your device,<strong>MPLAB</strong> IDE will warn you.1. Select <strong>Debugger</strong>>Breakpoints to open the Breakpoints dialog. The breakpointset in the previous section will be displayed in this dialog. Click the AddBreakpoint button to add another breakpoint.2. On the Program Memory tab of the Set Breakpoint dialog, enter “2e6” as the hexAddress and click OK.FIGURE 5-14:SET BREAKPOINTS DIALOGDS51766A-page 42© 2008 Microchip Technology <strong>In</strong>c.