Kleinkrantechnik Small Crane Technology Techique de monorails et ...
Kleinkrantechnik Small Crane Technology Techique de monorails et ...
Kleinkrantechnik Small Crane Technology Techique de monorails et ...

You also want an ePaper? Increase the reach of your titles
YUMPU automatically turns print PDFs into web optimized ePapers that Google loves.
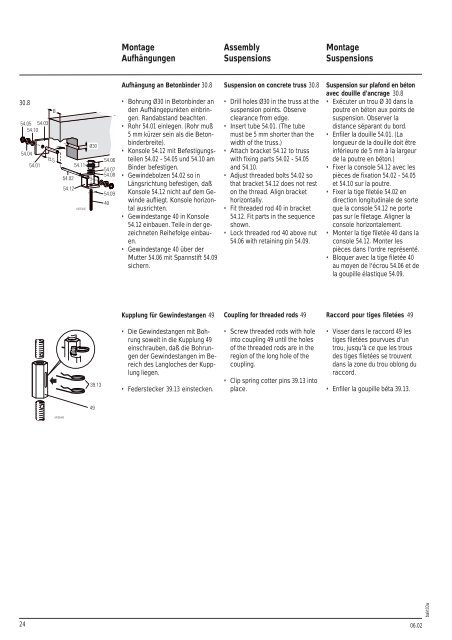
30.8<br />
24<br />
Montage<br />
Aufhängungen<br />
Aufhängung an B<strong>et</strong>onbin<strong>de</strong>r 30.8<br />
Bohrung Ø30 in B<strong>et</strong>onbin<strong>de</strong>r an<br />
<strong>de</strong>n Aufhängepunkten einbringen.<br />
Randabstand beachten.<br />
Rohr 54.01 einlegen. (Rohr muß<br />
5 mm kürzer sein als die B<strong>et</strong>onbin<strong>de</strong>rbreite).<br />
Konsole 54.12 mit Befestigungsteilen<br />
54.02 - 54.05 und 54.10 am<br />
Bin<strong>de</strong>r befestigen.<br />
Gewin<strong>de</strong>bolzen 54.02 so in<br />
Längsrichtung befestigen, daß<br />
Konsole 54.12 nicht auf <strong>de</strong>m Gewin<strong>de</strong><br />
aufliegt. Konsole horizontal<br />
ausrichten.<br />
Gewin<strong>de</strong>stange 40 in Konsole<br />
54.12 einbauen. Teile in <strong>de</strong>r gezeichn<strong>et</strong>en<br />
Reihefolge einbauen.<br />
Gewin<strong>de</strong>stange 40 über <strong>de</strong>r<br />
Mutter 54.06 mit Spannstift 54.09<br />
sichern.<br />
Kupplung für Gewin<strong>de</strong>stangen 49<br />
Die Gewin<strong>de</strong>stangen mit Bohrung<br />
soweit in die Kupplung 49<br />
einschrauben, daß die Bohrungen<br />
<strong>de</strong>r Gewin<strong>de</strong>stangen im Bereich<br />
<strong>de</strong>s Langloches <strong>de</strong>r Kupplung<br />
liegen.<br />
Fe<strong>de</strong>rstecker 39.13 einstecken.<br />
Assembly<br />
Suspensions<br />
Suspension on concr<strong>et</strong>e truss 30.8<br />
Drill holes Ø30 in the truss at the<br />
suspension points. Observe<br />
clearance from edge.<br />
Insert tube 54.01. (The tube<br />
must be 5 mm shorter than the<br />
width of the truss.)<br />
Attach brack<strong>et</strong> 54.12 to truss<br />
with fixing parts 54.02 - 54.05<br />
and 54.10.<br />
Adjust threa<strong>de</strong>d bolts 54.02 so<br />
that brack<strong>et</strong> 54.12 does not rest<br />
on the thread. Align brack<strong>et</strong><br />
horizontally.<br />
Fit threa<strong>de</strong>d rod 40 in brack<strong>et</strong><br />
54.12. Fit parts in the sequence<br />
shown.<br />
Lock threa<strong>de</strong>d rod 40 above nut<br />
54.06 with r<strong>et</strong>aining pin 54.09.<br />
Coupling for threa<strong>de</strong>d rods 49<br />
Screw threa<strong>de</strong>d rods with hole<br />
into coupling 49 until the holes<br />
of the threa<strong>de</strong>d rods are in the<br />
region of the long hole of the<br />
coupling.<br />
Clip spring cotter pins 39.13 into<br />
place.<br />
Montage<br />
Suspensions<br />
Suspension sur plafond en béton<br />
avec douille d'ancrage 30.8<br />
Exécuter un trou Ø 30 dans la<br />
poutre en béton aux points <strong>de</strong><br />
suspension. Observer la<br />
distance séparant du bord.<br />
Enfiler la douille 54.01. (La<br />
longueur <strong>de</strong> la douille doit être<br />
inférieure <strong>de</strong> 5 mm à la largeur<br />
<strong>de</strong> la poutre en béton.)<br />
Fixer la console 54.12 avec les<br />
pièces <strong>de</strong> fixation 54.02 - 54.05<br />
<strong>et</strong> 54.10 sur la poutre.<br />
Fixer la tige fil<strong>et</strong>ée 54.02 en<br />
direction longitudinale <strong>de</strong> sorte<br />
que la console 54.12 ne porte<br />
pas sur le fil<strong>et</strong>age. Aligner la<br />
console horizontalement.<br />
Monter la tige fil<strong>et</strong>ée 40 dans la<br />
console 54.12. Monter les<br />
pièces dans l'ordre représenté.<br />
Bloquer avec la tige fil<strong>et</strong>ée 40<br />
au moyen <strong>de</strong> l'écrou 54.06 <strong>et</strong> <strong>de</strong><br />
la goupille élastique 54.09.<br />
Raccord pour tiges fil<strong>et</strong>ées 49<br />
Visser dans le raccord 49 les<br />
tiges fil<strong>et</strong>ées pourvues d'un<br />
trou, jusqu'à ce que les trous<br />
<strong>de</strong>s tiges fil<strong>et</strong>ées se trouvent<br />
dans la zone du trou oblong du<br />
raccord.<br />
Enfiler la goupille béta 39.13.<br />
06.02<br />
bakt03a