

Samsung ML-3051N - User Manual_9.08 MB, pdf, ENGLISH
Samsung ML-3051N - User Manual_9.08 MB, pdf, ENGLISH
Samsung ML-3051N - User Manual_9.08 MB, pdf, ENGLISH

Create successful ePaper yourself
Turn your PDF publications into a flip-book with our unique Google optimized e-Paper software.
2 System setup<br />
This chapter provides step by step information on setting up your printer.<br />
This chapter includes:<br />
• Using control panel menus (<strong>ML</strong>-<strong>3051N</strong>, <strong>ML</strong>-<strong>3051N</strong>D only)<br />
• Menu overview<br />
• Printing a demo page<br />
• Changing the display language (<strong>ML</strong>-<strong>3051N</strong>, <strong>ML</strong>-<strong>3051N</strong>D only)<br />
• Changing the font setting<br />
• Using toner save mode<br />
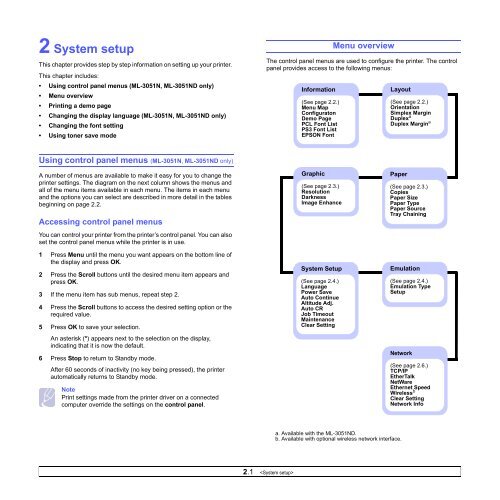
Menu overview<br />
The control panel menus are used to configure the printer. The control<br />
panel provides access to the following menus:<br />
Information<br />
(See page 2.2.)<br />
Menu Map<br />
Configuraton<br />
Demo Page<br />
PCL Font List<br />
PS3 Font List<br />
EPSON Font<br />
Layout<br />
(See page 2.2.)<br />
Orientation<br />
Simplex Margin<br />
Duplex a<br />
Duplex Margin a<br />
Using control panel menus (<strong>ML</strong>-<strong>3051N</strong>, <strong>ML</strong>-<strong>3051N</strong>D only)<br />
A number of menus are available to make it easy for you to change the<br />
printer settings. The diagram on the next column shows the menus and<br />
all of the menu items available in each menu. The items in each menu<br />
and the options you can select are described in more detail in the tables<br />
beginning on page 2.2.<br />
Accessing control panel menus<br />
You can control your printer from the printer’s control panel. You can also<br />
set the control panel menus while the printer is in use.<br />
1 Press Menu until the menu you want appears on the bottom line of<br />
the display and press OK.<br />
2 Press the Scroll buttons until the desired menu item appears and<br />
press OK.<br />
3 If the menu item has sub menus, repeat step 2.<br />
4 Press the Scroll buttons to access the desired setting option or the<br />
required value.<br />
5 Press OK to save your selection.<br />
An asterisk (*) appears next to the selection on the display,<br />
indicating that it is now the default.<br />
6 Press Stop to return to Standby mode.<br />
After 60 seconds of inactivity (no key being pressed), the printer<br />
automatically returns to Standby mode.<br />
Note<br />
Print settings made from the printer driver on a connected<br />
computer override the settings on the control panel.<br />
Graphic<br />
(See page 2.3.)<br />
Resolution<br />
Darkness<br />
Image Enhance<br />
System Setup<br />
(See page 2.4.)<br />
Language<br />
Power Save<br />
Auto Continue<br />
Altitude Adj.<br />
Auto CR<br />
Job Timeout<br />
Maintenance<br />
Clear Setting<br />
Paper<br />
(See page 2.3.)<br />
Copies<br />
Paper Size<br />
Paper Type<br />
Paper Source<br />
Tray Chaining<br />
Emulation<br />
(See page 2.4.)<br />
Emulation Type<br />
Setup<br />
Network<br />
(See page 2.6.)<br />
TCP/IP<br />
EtherTalk<br />
NetWare<br />
Ethernet Speed<br />
Wireless b<br />
Clear Setting<br />
Network Info<br />
a. Available with the <strong>ML</strong>-<strong>3051N</strong>D.<br />
b. Available with optional wireless network interface.<br />
2.1


