

Samsung ML-3051N - User Manual_9.08 MB, pdf, ENGLISH
Samsung ML-3051N - User Manual_9.08 MB, pdf, ENGLISH
Samsung ML-3051N - User Manual_9.08 MB, pdf, ENGLISH

You also want an ePaper? Increase the reach of your titles
YUMPU automatically turns print PDFs into web optimized ePapers that Google loves.
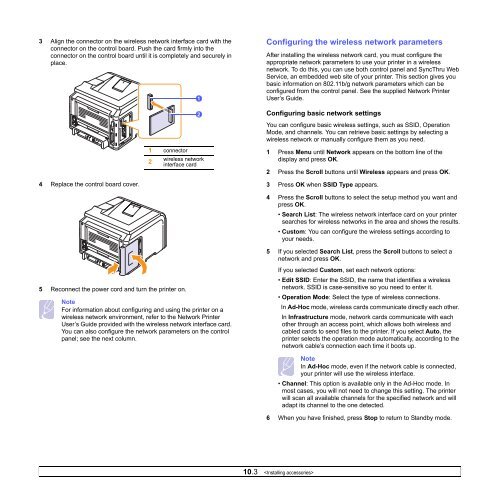
3 Align the connector on the wireless network interface card with the<br />
connector on the control board. Push the card firmly into the<br />
connector on the control board until it is completely and securely in<br />
place.<br />
1<br />
2<br />
Configuring the wireless network parameters<br />
After installing the wireless network card, you must configure the<br />
appropriate network parameters to use your printer in a wireless<br />
network. To do this, you can use both control panel and SyncThru Web<br />
Service, an embedded web site of your printer. This section gives you<br />
basic information on 802.11b/g network parameters which can be<br />
configured from the control panel. See the supplied Network Printer<br />
<strong>User</strong>’s Guide.<br />
Configuring basic network settings<br />
You can configure basic wireless settings, such as SSID, Operation<br />
Mode, and channels. You can retrieve basic settings by selecting a<br />
wireless network or manually configure them as you need.<br />
1 connector<br />
wireless network<br />
2<br />
interface card<br />
1 Press Menu until Network appears on the bottom line of the<br />
display and press OK.<br />
2 Press the Scroll buttons until Wireless appears and press OK.<br />
4 Replace the control board cover.<br />
3 Press OK when SSID Type appears.<br />
4 Press the Scroll buttons to select the setup method you want and<br />
press OK.<br />
• Search List: The wireless network interface card on your printer<br />
searches for wireless networks in the area and shows the results.<br />
• Custom: You can configure the wireless settings according to<br />
your needs.<br />
5 If you selected Search List, press the Scroll buttons to select a<br />
network and press OK.<br />
5 Reconnect the power cord and turn the printer on.<br />
Note<br />
For information about configuring and using the printer on a<br />
wireless network environment, refer to the Network Printer<br />
<strong>User</strong>’s Guide provided with the wireless network interface card.<br />
You can also configure the network parameters on the control<br />
panel; see the next column.<br />
If you selected Custom, set each network options:<br />
• Edit SSID: Enter the SSID, the name that identifies a wireless<br />
network. SSID is case-sensitive so you need to enter it.<br />
• Operation Mode: Select the type of wireless connections.<br />
In Ad-Hoc mode, wireless cards communicate directly each other.<br />
In Infrastructure mode, network cards communicate with each<br />
other through an access point, which allows both wireless and<br />
cabled cards to send files to the printer. If you select Auto, the<br />
printer selects the operation mode automatically, according to the<br />
network cable’s connection each time it boots up.<br />
Note<br />
In Ad-Hoc mode, even if the network cable is connected,<br />
your printer will use the wireless interface.<br />
• Channel: This option is available only in the Ad-Hoc mode. In<br />
most cases, you will not need to change this setting. The printer<br />
will scan all available channels for the specified network and will<br />
adapt its channel to the one detected.<br />
6 When you have finished, press Stop to return to Standby mode.<br />
10.3


