

Samsung ML-3051N - User Manual_9.08 MB, pdf, ENGLISH
Samsung ML-3051N - User Manual_9.08 MB, pdf, ENGLISH
Samsung ML-3051N - User Manual_9.08 MB, pdf, ENGLISH

You also want an ePaper? Increase the reach of your titles
YUMPU automatically turns print PDFs into web optimized ePapers that Google loves.
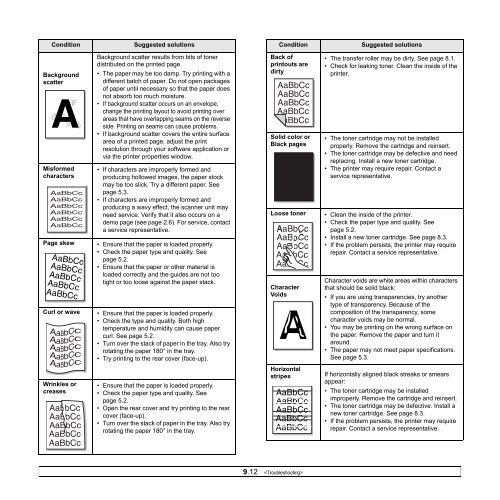
Condition<br />
Suggested solutions<br />
Condition<br />
Suggested solutions<br />
Background<br />
scatter<br />
A<br />
Misformed<br />
characters<br />
Page skew<br />
AaBbCc<br />
AaBbCc<br />
AaBbCc<br />
AaBbCc<br />
AaBbCc<br />
Curl or wave<br />
Background scatter results from bits of toner<br />
distributed on the printed page.<br />
• The paper may be too damp. Try printing with a<br />
different batch of paper. Do not open packages<br />
of paper until necessary so that the paper does<br />
not absorb too much moisture.<br />
• If background scatter occurs on an envelope,<br />
change the printing layout to avoid printing over<br />
areas that have overlapping seams on the reverse<br />
side. Printing on seams can cause problems.<br />
• If background scatter covers the entire surface<br />
area of a printed page, adjust the print<br />
resolution through your software application or<br />
via the printer properties window.<br />
• If characters are improperly formed and<br />
producing hollowed images, the paper stock<br />
may be too slick. Try a different paper. See<br />
page 5.3.<br />
• If characters are improperly formed and<br />
producing a wavy effect, the scanner unit may<br />
need service. Verify that it also occurs on a<br />
demo page (see page 2.6). For service, contact<br />
a service representative.<br />
• Ensure that the paper is loaded properly.<br />
• Check the paper type and quality. See<br />
page 5.2.<br />
• Ensure that the paper or other material is<br />
loaded correctly and the guides are not too<br />
tight or too loose against the paper stack.<br />
• Ensure that the paper is loaded properly.<br />
• Check the type and quality. Both high<br />
temperature and humidity can cause paper<br />
curl. See page 5.2.<br />
• Turn over the stack of paper in the tray. Also try<br />
rotating the paper 180° in the tray.<br />
• Try printing to the rear cover (face-up).<br />
Back of<br />
printouts are<br />
dirty<br />
Solid color or<br />
Black pages<br />
A<br />
Loose toner<br />
Character<br />
Voids<br />
A<br />
• The transfer roller may be dirty. See page 8.1.<br />
• Check for leaking toner. Clean the inside of the<br />
printer.<br />
• The toner cartridge may not be installed<br />
properly. Remove the cartridge and reinsert.<br />
• The toner cartridge may be defective and need<br />
replacing. Install a new toner cartridge.<br />
• The printer may require repair. Contact a<br />
service representative.<br />
• Clean the inside of the printer.<br />
• Check the paper type and quality. See<br />
page 5.2.<br />
• Install a new toner cartridge. See page 8.3.<br />
• If the problem persists, the printer may require<br />
repair. Contact a service representative.<br />
Character voids are white areas within characters<br />
that should be solid black:<br />
• If you are using transparencies, try another<br />
type of transparency. Because of the<br />
composition of the transparency, some<br />
character voids may be normal.<br />
• You may be printing on the wrong surface on<br />
the paper. Remove the paper and turn it<br />
around.<br />
• The paper may not meet paper specifications.<br />
See page 5.3.<br />
Wrinkles or<br />
creases<br />
• Ensure that the paper is loaded properly.<br />
• Check the paper type and quality. See<br />
page 5.2.<br />
• Open the rear cover and try printing to the rear<br />
cover (face-up).<br />
• Turn over the stack of paper in the tray. Also try<br />
rotating the paper 180° in the tray.<br />
Horizontal<br />
stripes<br />
AaBbCc<br />
AaBbCc<br />
AaBbCc<br />
AaBbCc<br />
AaBbCc<br />
If horizontally aligned black streaks or smears<br />
appear:<br />
• The toner cartridge may be installed<br />
improperly. Remove the cartridge and reinsert.<br />
• The toner cartridge may be defective. Install a<br />
new toner cartridge. See page 8.3.<br />
• If the problem persists, the printer may require<br />
repair. Contact a service representative.<br />
9.12


