- Page 1 and 2:
RingMaster Monitoring and Managemen
- Page 3 and 4:
About This Guide RingMaster 7.4 Man
- Page 5 and 6:
Convention Use Bold italic text fon
- Page 7 and 8:
Agreement are incorporated herein i
- Page 9 and 10:
1 RingMaster Services This chapter
- Page 11 and 12:
Connecting a Client to RingMaster S
- Page 13 and 14:
Certificate Check RingMaster Servic
- Page 15 and 16:
RingMaster Services Home Page RingM
- Page 17 and 18:
Setup Tab Server Settings RingMaste
- Page 19 and 20:
Server Certificate Select Server Ce
- Page 21 and 22:
RingMaster Services ❑ RMTS-250
- Page 23 and 24:
RingMaster Services 5. To prevent R
- Page 25 and 26:
RingMaster Services 3. To change Po
- Page 27 and 28:
Access Control Tab RingMaster Servi
- Page 29 and 30:
User Groups RingMaster Services Use
- Page 31 and 32:
Plan Management Tab New Plan RingMa
- Page 33 and 34:
Delete Plans RingMaster Services To
- Page 35 and 36:
Backup and Restore RingMaster Servi
- Page 37 and 38:
Deleting a Plan Backup RingMaster S
- Page 39 and 40:
Alarms Select Maintenance, then sel
- Page 41 and 42:
Log RingMaster Services Select Main
- Page 43 and 44:
Threads Select Maintenance, then se
- Page 45 and 46:
RingMaster Client Preferences This
- Page 47 and 48:
RingMaster Client Preferences 3. In
- Page 49 and 50:
RingMaster Client Preferences f. To
- Page 51 and 52:
Certificate Management RingMaster C
- Page 53 and 54:
Managing with RingMaster This chapt
- Page 55 and 56:
Radius Attribute Name Acct-Session-
- Page 57 and 58:
Configuration/RF Planning View Mana
- Page 59 and 60:
❍ Upload MX ❍ Convert Auto AP
- Page 61 and 62:
Task Review Local Changes Deploy Un
- Page 63 and 64:
Reports View Managing with RingMast
- Page 65 and 66:
Managing with RingMaster labels inc
- Page 67 and 68:
Managing with RingMaster Users can
- Page 69 and 70:
3. From the Task list, select Creat
- Page 71 and 72:
❑ Snoop Filter ❑ SNMP Under Oth
- Page 73 and 74:
Creating Locales Using RF Planning
- Page 75 and 76:
1. Select a Location Server from th
- Page 77 and 78:
1. Under Create, click Create RF Fi
- Page 79 and 80:
1. Click Edit Location Server to di
- Page 81 and 82:
. 7. Click Next. Managing with Ring
- Page 83 and 84:
Managing with RingMaster If you sel
- Page 85 and 86:
Managing with RingMaster ❑ Client
- Page 87 and 88:
Network Changes Managing with RingM
- Page 89 and 90:
Viewing Policy Changes Managing wit
- Page 91 and 92:
Deploying Local Changes Managing wi
- Page 93 and 94:
3. In the Tasks panel, select View
- Page 95 and 96:
3. From the Tasks, select Image Rep
- Page 97 and 98:
Managing with RingMaster 2. In the
- Page 99 and 100:
Managing with RingMaster ❑ The We
- Page 101 and 102:
Managing with RingMaster This butto
- Page 103 and 104:
Monitor Function This chapter highl
- Page 105 and 106:
Monitor Function multiple sites man
- Page 107 and 108:
Cluster Status Monitoring In the Do
- Page 109 and 110:
Monitor Function This table indicat
- Page 111 and 112:
Monitor Function ❑ RingMaster pro
- Page 113 and 114:
Monitor Function panel is selected,
- Page 115 and 116:
Status Monitor or Status Summary De
- Page 117 and 118:
Noise Floor Monitor Function If you
- Page 119 and 120:
Coverage Hole If you click on Cover
- Page 121 and 122:
Monitor Function This dialog allows
- Page 123 and 124:
Session Details ❍ View ◆Session
- Page 125 and 126:
Locating A User Monitor Function Di
- Page 127 and 128:
Traffic Monitor Dashboard Monitor F
- Page 129 and 130:
Monitor Function The following scre
- Page 131 and 132:
Traffic Details Monitor Function Cl
- Page 133 and 134:
Finding a User You can find a user
- Page 135 and 136:
Monitor Function You can display a
- Page 137 and 138:
View User Performance Statistics Mo
- Page 139 and 140:
3. Click Details in the Traffic Sum
- Page 141 and 142:
Monitor Function Optimize your netw
- Page 143 and 144:
Managing Alarms Fault Management is
- Page 145 and 146:
Managing Alarms ❍ Performance ❍
- Page 147 and 148:
❍Alarms ◆Event Details ◆Setup
- Page 149 and 150:
Managing Alarms You can select seve
- Page 151 and 152:
Alarms Database Query Managing Alar
- Page 153 and 154:
Detecting Rogue Devices AP radios a
- Page 155 and 156:
Figure 1-1. Rogue Detection Algorit
- Page 157 and 158:
Detecting Rogue Devices Select OK a
- Page 159 and 160:
The approximate location of a rogue
- Page 161 and 162:
RF Classification If you click RF C
- Page 163 and 164:
Rogue Devices If you click Rogue De
- Page 165 and 166:
Clicking on the link provided shows
- Page 167 and 168:
Unauthorized Devices If you click U
- Page 169 and 170:
Displaying Rogue Details Detecting
- Page 171 and 172:
Column Description Channel SSID Dis
- Page 173 and 174:
The Client Location screen appears,
- Page 175 and 176:
Converting a Rogue into a Third Par
- Page 177 and 178:
RingMaster Reports The Reports butt
- Page 179 and 180:
RingMaster Reports 4. To generate a
- Page 181 and 182: RingMaster Reports 2. In the Report
- Page 183 and 184: RingMaster Reports Copyright © 201
- Page 185 and 186: 7. When the report is generated, cl
- Page 187 and 188: Table 1- 3 lists the sections in an
- Page 189 and 190: Client Summary Report Changes In th
- Page 191 and 192: 10. Click Next to generate the repo
- Page 193 and 194: 4. To generate a new report, click
- Page 195 and 196: Top APs ❑ Cumulative errors for t
- Page 197 and 198: 5. Select parameters for the report
- Page 199 and 200: SmartPass New Reports SMS/Email Not
- Page 201 and 202: RingMaster Reports ❑ Network Plan
- Page 203 and 204: RF Summary Report Changes New colum
- Page 205 and 206: Radio Detail Report Changes New col
- Page 207 and 208: 10. When the report is generated, c
- Page 209 and 210: 11. When the report is generated, a
- Page 211 and 212: 5. Select the scope type of the rep
- Page 213 and 214: 1. Click Alarm History in the Tasks
- Page 215 and 216: 1. Select the Reports Navigation Ba
- Page 217 and 218: Site Survey Order RingMaster Report
- Page 219 and 220: 8. Click Generate to generate the r
- Page 221 and 222: 2. In the Organizer panel, select R
- Page 223 and 224: Saving a Report RingMaster Reports
- Page 225 and 226: To schedule and e-mail a report: Ri
- Page 227 and 228: Working with Network Plans A networ
- Page 229 and 230: Working with Network Plans 1. In th
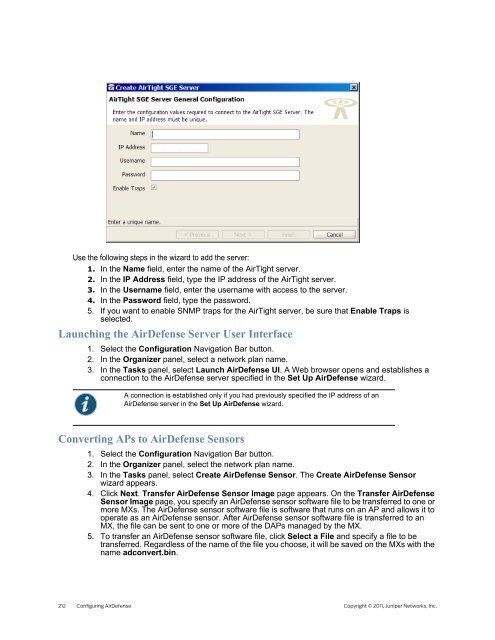
- Page 231: Configuring AirDefense The AirDefen