RingMaster Management Guide - Juniper Networks
RingMaster Management Guide - Juniper Networks
RingMaster Management Guide - Juniper Networks

Create successful ePaper yourself
Turn your PDF publications into a flip-book with our unique Google optimized e-Paper software.
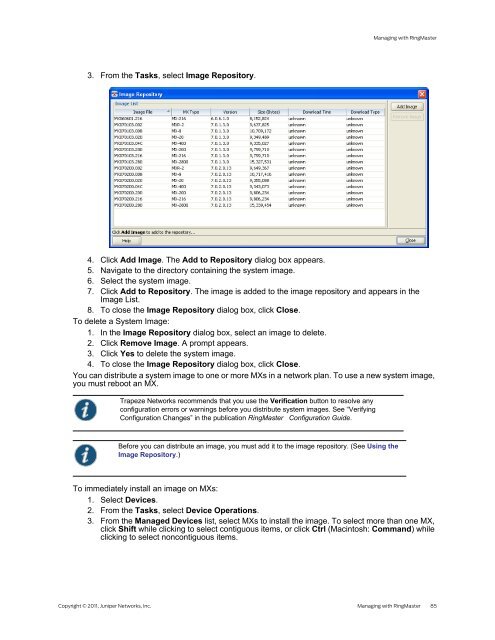
3. From the Tasks, select Image Repository.<br />
Managing with <strong>RingMaster</strong><br />
4. Click Add Image. The Add to Repository dialog box appears.<br />
5. Navigate to the directory containing the system image.<br />
6. Select the system image.<br />
7. Click Add to Repository. The image is added to the image repository and appears in the<br />
Image List.<br />
8. To close the Image Repository dialog box, click Close.<br />
To delete a System Image:<br />
1. In the Image Repository dialog box, select an image to delete.<br />
2. Click Remove Image. A prompt appears.<br />
3. Click Yes to delete the system image.<br />
4. To close the Image Repository dialog box, click Close.<br />
You can distribute a system image to one or more MXs in a network plan. To use a new system image,<br />
you must reboot an MX.<br />
Trapeze <strong>Networks</strong> recommends that you use the Verification button to resolve any<br />
configuration errors or warnings before you distribute system images. See “Verifying<br />
Configuration Changes” in the publication <strong>RingMaster</strong> Configuration <strong>Guide</strong>.<br />
Before you can distribute an image, you must add it to the image repository. (See Using the<br />
Image Repository.)<br />
To immediately install an image on MXs:<br />
1. Select Devices.<br />
2. From the Tasks, select Device Operations.<br />
3. From the Managed Devices list, select MXs to install the image. To select more than one MX,<br />
click Shift while clicking to select contiguous items, or click Ctrl (Macintosh: Command) while<br />
clicking to select noncontiguous items.<br />
Copyright © 2011, <strong>Juniper</strong> <strong>Networks</strong>, Inc. Managing with <strong>RingMaster</strong> 85