RingMaster Management Guide - Juniper Networks
RingMaster Management Guide - Juniper Networks
RingMaster Management Guide - Juniper Networks

You also want an ePaper? Increase the reach of your titles
YUMPU automatically turns print PDFs into web optimized ePapers that Google loves.
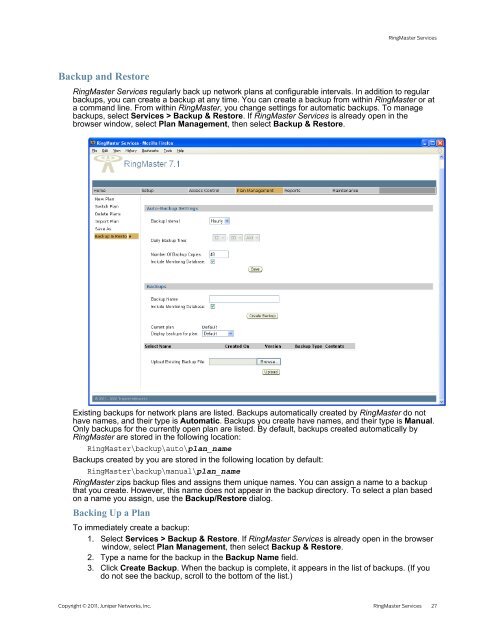
Backup and Restore<br />
<strong>RingMaster</strong> Services<br />
<strong>RingMaster</strong> Services regularly back up network plans at configurable intervals. In addition to regular<br />
backups, you can create a backup at any time. You can create a backup from within <strong>RingMaster</strong> or at<br />
a command line. From within <strong>RingMaster</strong>, you change settings for automatic backups. To manage<br />
backups, select Services > Backup & Restore. If <strong>RingMaster</strong> Services is already open in the<br />
browser window, select Plan <strong>Management</strong>, then select Backup & Restore.<br />
Existing backups for network plans are listed. Backups automatically created by <strong>RingMaster</strong> do not<br />
have names, and their type is Automatic. Backups you create have names, and their type is Manual.<br />
Only backups for the currently open plan are listed. By default, backups created automatically by<br />
<strong>RingMaster</strong> are stored in the following location:<br />
<strong>RingMaster</strong>\backup\auto\plan_name<br />
Backups created by you are stored in the following location by default:<br />
<strong>RingMaster</strong>\backup\manual\plan_name<br />
<strong>RingMaster</strong> zips backup files and assigns them unique names. You can assign a name to a backup<br />
that you create. However, this name does not appear in the backup directory. To select a plan based<br />
on a name you assign, use the Backup/Restore dialog.<br />
Backing Up a Plan<br />
To immediately create a backup:<br />
1. Select Services > Backup & Restore. If <strong>RingMaster</strong> Services is already open in the browser<br />
window, select Plan <strong>Management</strong>, then select Backup & Restore.<br />
2. Type a name for the backup in the Backup Name field.<br />
3. Click Create Backup. When the backup is complete, it appears in the list of backups. (If you<br />
do not see the backup, scroll to the bottom of the list.)<br />
Copyright © 2011, <strong>Juniper</strong> <strong>Networks</strong>, Inc. <strong>RingMaster</strong> Services 27