

service manual ar-203e ar-203e x ar-m200 ar-m201 model ar-5420
service manual ar-203e ar-203e x ar-m200 ar-m201 model ar-5420
service manual ar-203e ar-203e x ar-m200 ar-m201 model ar-5420

Create successful ePaper yourself
Turn your PDF publications into a flip-book with our unique Google optimized e-Paper software.
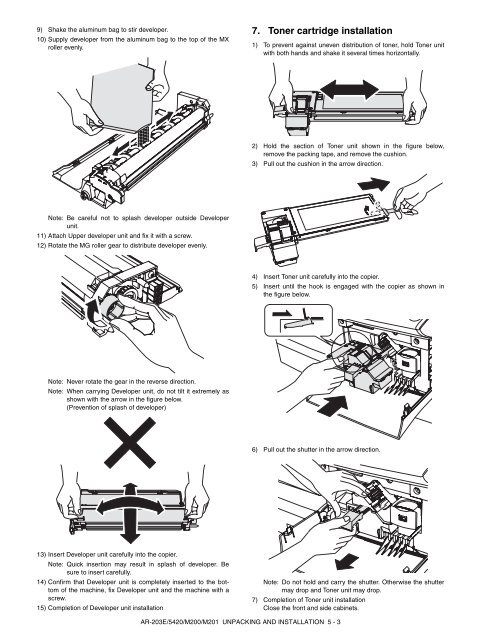
9) Shake the aluminum bag to stir developer.<br />
10) Supply developer from the aluminum bag to the top of the MX<br />
roller evenly.<br />
Note: Be c<strong>ar</strong>eful not to splash developer outside Developer<br />
unit.<br />
11) Attach Upper developer unit and fix it with a screw.<br />
12) Rotate the MG roller ge<strong>ar</strong> to distribute developer evenly.<br />
Note: Never rotate the ge<strong>ar</strong> in the reverse direction.<br />
Note: When c<strong>ar</strong>rying Developer unit, do not tilt it extremely as<br />
shown with the <strong>ar</strong>row in the figure below.<br />
(Prevention of splash of developer)<br />
13) Insert Developer unit c<strong>ar</strong>efully into the copier.<br />
Note: Quick insertion may result in splash of developer. Be<br />
sure to insert c<strong>ar</strong>efully.<br />
14) Confirm that Developer unit is completely inserted to the bottom<br />
of the machine, fix Developer unit and the machine with a<br />
screw.<br />
15) Completion of Developer unit installation<br />
7. Toner c<strong>ar</strong>tridge installation<br />
AR-203E/<strong>5420</strong>/M200/M201 UNPACKING AND INSTALLATION 5 - 3<br />
1) To prevent against uneven distribution of toner, hold Toner unit<br />
with both hands and shake it several times horizontally.<br />
2) Hold the section of Toner unit shown in the figure below,<br />
remove the packing tape, and remove the cushion.<br />
3) Pull out the cushion in the <strong>ar</strong>row direction.<br />
4) Insert Toner unit c<strong>ar</strong>efully into the copier.<br />
5) Insert until the hook is engaged with the copier as shown in<br />
the figure below.<br />
6) Pull out the shutter in the <strong>ar</strong>row direction.<br />
Note: Do not hold and c<strong>ar</strong>ry the shutter. Otherwise the shutter<br />
may drop and Toner unit may drop.<br />
7) Completion of Toner unit installation<br />
Close the front and side cabinets.


