

service manual ar-203e ar-203e x ar-m200 ar-m201 model ar-5420
service manual ar-203e ar-203e x ar-m200 ar-m201 model ar-5420
service manual ar-203e ar-203e x ar-m200 ar-m201 model ar-5420

You also want an ePaper? Increase the reach of your titles
YUMPU automatically turns print PDFs into web optimized ePapers that Google loves.
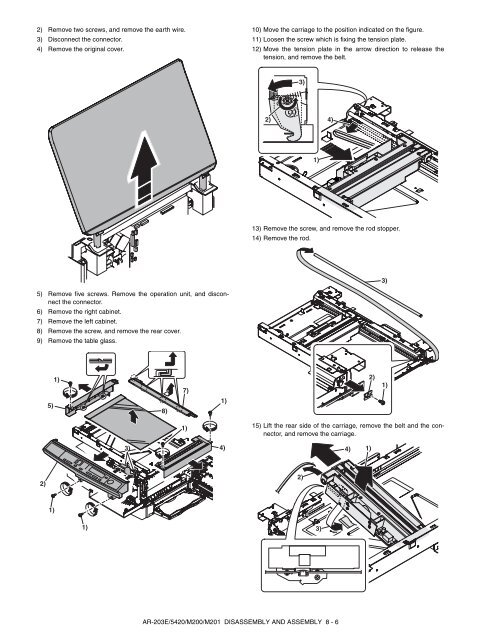
2) Remove two screws, and remove the e<strong>ar</strong>th wire.<br />
3) Disconnect the connector.<br />
4) Remove the original cover.<br />
5) Remove five screws. Remove the operation unit, and disconnect<br />
the connector.<br />
6) Remove the right cabinet.<br />
7) Remove the left cabinet.<br />
8) Remove the screw, and remove the re<strong>ar</strong> cover.<br />
9) Remove the table glass.<br />
2)<br />
5)<br />
1)<br />
1)<br />
1)<br />
3)<br />
8)<br />
7)<br />
1)<br />
1)<br />
4)<br />
AR-203E/<strong>5420</strong>/M200/M201 DISASSEMBLY AND ASSEMBLY 8 - 6<br />
10) Move the c<strong>ar</strong>riage to the position indicated on the figure.<br />
11) Loosen the screw which is fixing the tension plate.<br />
12) Move the tension plate in the <strong>ar</strong>row direction to release the<br />
tension, and remove the belt.<br />
3)<br />
2) 4)<br />
1)<br />
13) Remove the screw, and remove the rod stopper.<br />
14) Remove the rod.<br />
15) Lift the re<strong>ar</strong> side of the c<strong>ar</strong>riage, remove the belt and the connector,<br />
and remove the c<strong>ar</strong>riage.<br />
2)<br />
3)<br />
4)<br />
1)<br />
2)<br />
3)<br />
1)


