

service manual ar-203e ar-203e x ar-m200 ar-m201 model ar-5420
service manual ar-203e ar-203e x ar-m200 ar-m201 model ar-5420
service manual ar-203e ar-203e x ar-m200 ar-m201 model ar-5420

Create successful ePaper yourself
Turn your PDF publications into a flip-book with our unique Google optimized e-Paper software.
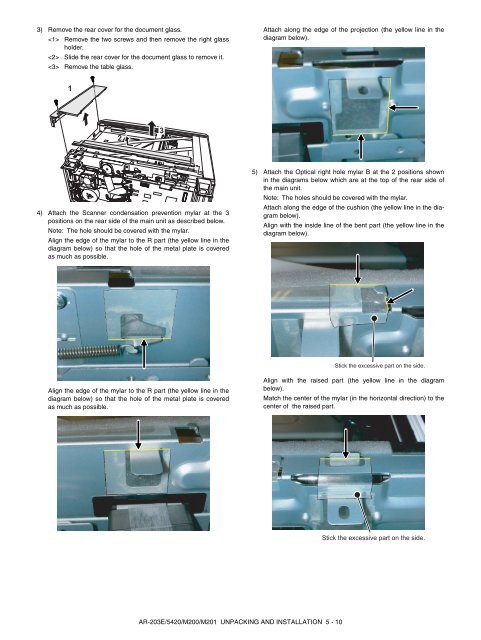
3) Remove the re<strong>ar</strong> cover for the document glass.<br />
Remove the two screws and then remove the right glass<br />
holder.<br />
Slide the re<strong>ar</strong> cover for the document glass to remove it.<br />
Remove the table glass.<br />
1<br />
2<br />
4) Attach the Scanner condensation prevention myl<strong>ar</strong> at the 3<br />
positions on the re<strong>ar</strong> side of the main unit as described below.<br />
Note: The hole should be covered with the myl<strong>ar</strong>.<br />
Align the edge of the myl<strong>ar</strong> to the R p<strong>ar</strong>t (the yellow line in the<br />
diagram below) so that the hole of the metal plate is covered<br />
as much as possible.<br />
Align the edge of the myl<strong>ar</strong> to the R p<strong>ar</strong>t (the yellow line in the<br />
diagram below) so that the hole of the metal plate is covered<br />
as much as possible.<br />
3<br />
AR-203E/<strong>5420</strong>/M200/M201 UNPACKING AND INSTALLATION 5 - 10<br />
Attach along the edge of the projection (the yellow line in the<br />
diagram below).<br />
5) Attach the Optical right hole myl<strong>ar</strong> B at the 2 positions shown<br />
in the diagrams below which <strong>ar</strong>e at the top of the re<strong>ar</strong> side of<br />
the main unit.<br />
Note: The holes should be covered with the myl<strong>ar</strong>.<br />
Attach along the edge of the cushion (the yellow line in the diagram<br />
below).<br />
Align with the inside line of the bent p<strong>ar</strong>t (the yellow line in the<br />
diagram below).<br />
Stick the excessive p<strong>ar</strong>t on the side.<br />
Align with the raised p<strong>ar</strong>t (the yellow line in the diagram<br />
below).<br />
Match the center of the myl<strong>ar</strong> (in the horizontal direction) to the<br />
center of the raised p<strong>ar</strong>t.<br />
Stick the excessive p<strong>ar</strong>t on the side.


