- Page 1:
DNR200V SeriesNetwork Video Surveil
- Page 4 and 5:
Service13. Servicing - Do not attem
- Page 6 and 7:
Features• Easy Connection and set
- Page 8:
Updating Firmware . . . . . . . . .
- Page 11 and 12:
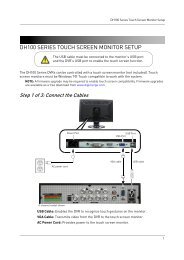
GETTING STARTEDThe system comes wit
- Page 13 and 14:
FRONT PANEL1 23451. IR Receiver: IR
- Page 15 and 16:
REMOTE CONTROL1. Power: Press and h
- Page 17 and 18:
Using the SystemUSING THE SYSTEMThe
- Page 19 and 20:
Using the SystemOR Use Color mode t
- Page 21 and 22:
Using the SystemUsing the Virtual K
- Page 24 and 25:
Search (Playback)SEARCH (PLAYBACK)S
- Page 26 and 27:
BACKUPBackup video files to externa
- Page 28 and 29:
Backup2. Start playing back video u
- Page 30 and 31:
Using the Main MenuUSING THE MAIN M
- Page 32 and 33:
Using the Main Menu2. Copy the firm
- Page 34 and 35:
Using the Main MenuRecordingstreami
- Page 36 and 37:
Using the Main Menu• HTTP Port: U
- Page 38 and 39:
Using the Main Menu• Port: Enter
- Page 40 and 41:
Using the Main Menuoptions allow yo
- Page 42 and 43:
Using the Main MenuAdvancedConfigur
- Page 44 and 45:
Using the Main MenuBackup to use th
- Page 46 and 47:
Using the Main MenuModifying Accoun
- Page 48 and 49:
Using the Main Menu4. Click Export.
- Page 50 and 51:
DigiNet NVR Central Management Soft
- Page 52 and 53:
DigiNet NVR Central Management Soft
- Page 54 and 55:
DigiNet NVR Central Management Soft
- Page 56 and 57:
3. Check Search.Select alarm typeCh
- Page 58 and 59:
DigiNet NVR Central Management Soft
- Page 60 and 61:
• You may also select a task or p
- Page 62 and 63:
2. Click on a display area in the m
- Page 64 and 65: DigiNet NVR Central Management Soft
- Page 66 and 67: 2. Click Search to detect secondary
- Page 68 and 69: 7. Click and drag cameras to the di
- Page 70 and 71: 5. Click a search result and then c
- Page 72 and 73: 5. Tap Add>Manually Add.Tap Add6. C
- Page 74 and 75: Mobile ConnectivityUsing Playback M
- Page 76 and 77: Mobile Connectivity3. Tap Motion De
- Page 78 and 79: Mobile Connectivity6. Configure the
- Page 80 and 81: Mobile ConnectivityUsing Playback M
- Page 82 and 83: Mobile Connectivity5. Tap OK. A tes
- Page 84 and 85: Mobile Connectivity10. Tap + on one
- Page 86 and 87: Mobile Connectivity3. Tap + and sel
- Page 88 and 89: Mobile Connectivity4. Tap OK. A tes
- Page 90 and 91: Mobile Connectivity9. In landscape
- Page 92 and 93: Mobile ConnectivityEnabling Push No
- Page 94 and 95: Mobile Connectivity2. Tap . Tap OK
- Page 96 and 97: Appendix A: System SpecificationsVi
- Page 98 and 99: Appendix B: Setting up Remote Viewi
- Page 100 and 101: Appendix C: Auto Port Forwarding Wi
- Page 102 and 103: Appendix C: Auto Port Forwarding Wi
- Page 104 and 105: Appendix C: Auto Port Forwarding Wi
- Page 106 and 107: Appendix C: Auto Port Forwarding Wi
- Page 108 and 109: Appendix D: Setting Up DDNS Service
- Page 110 and 111: Appendix E: Remote Firmware Upgrade
- Page 112 and 113: Appendix E: Remote Firmware Upgrade
- Page 116 and 117: Appendix F: Hard Drive Installation
- Page 118 and 119: Troubleshooting• Hard drive is no
- Page 120: Need Help?Please make sure to visit