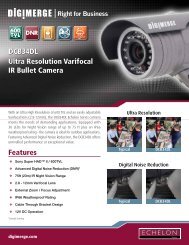
DNR200V_SERIES_MANUAL_EN_R1_web - Digimerge
DNR200V_SERIES_MANUAL_EN_R1_web - Digimerge
DNR200V_SERIES_MANUAL_EN_R1_web - Digimerge
- No tags were found...

You also want an ePaper? Increase the reach of your titles
YUMPU automatically turns print PDFs into web optimized ePapers that Google loves.
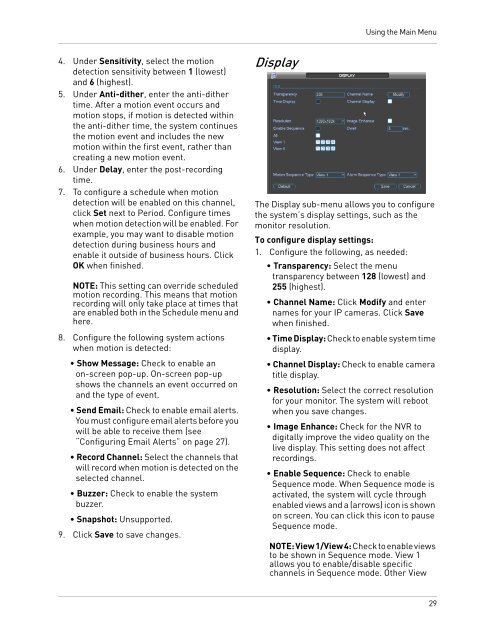
Using the Main Menu4. Under Sensitivity, select the motiondetection sensitivity between 1 (lowest)and 6 (highest).5. Under Anti-dither, enter the anti-dithertime. After a motion event occurs andmotion stops, if motion is detected withinthe anti-dither time, the system continuesthe motion event and includes the newmotion within the first event, rather thancreating a new motion event.6. Under Delay, enter the post-recordingtime.7. To configure a schedule when motiondetection will be enabled on this channel,click Set next to Period. Configure timeswhen motion detection will be enabled. Forexample, you may want to disable motiondetection during business hours andenable it outside of business hours. ClickOK when finished.NOTE: This setting can override scheduledmotion recording. This means that motionrecording will only take place at times thatare enabled both in the Schedule menu andhere.8. Configure the following system actionswhen motion is detected:• Show Message: Check to enable anon-screen pop-up. On-screen pop-upshows the channels an event occurred onand the type of event.• Send Email: Check to enable email alerts.You must configure email alerts before youwill be able to receive them (see“Configuring Email Alerts” on page 27).• Record Channel: Select the channels thatwill record when motion is detected on theselected channel.• Buzzer: Check to enable the systembuzzer.• Snapshot: Unsupported.9. Click Save to save changes.DisplayThe Display sub-menu allows you to configurethe system’s display settings, such as themonitor resolution.To configure display settings:1. Configure the following, as needed:• Transparency: Select the menutransparency between 128 (lowest) and255 (highest).• Channel Name: Click Modify and enternames for your IP cameras. Click Savewhen finished.• Time Display: Check to enable system timedisplay.• Channel Display: Check to enable cameratitle display.• Resolution: Select the correct resolutionfor your monitor. The system will rebootwhen you save changes.• Image Enhance: Check for the NVR todigitally improve the video quality on thelive display. This setting does not affectrecordings.• Enable Sequence: Check to enableSequence mode. When Sequence mode isactivated, the system will cycle throughenabled views and a (arrows) icon is shownon screen. You can click this icon to pauseSequence mode.NOTE: View 1/View 4: Check to enable viewsto be shown in Sequence mode. View 1allows you to enable/disable specificchannels in Sequence mode. Other View29