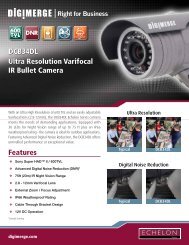
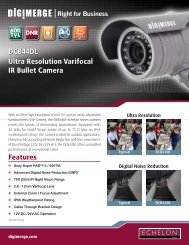
DNR200V_SERIES_MANUAL_EN_R1_web - Digimerge
DNR200V_SERIES_MANUAL_EN_R1_web - Digimerge
DNR200V_SERIES_MANUAL_EN_R1_web - Digimerge
- No tags were found...

You also want an ePaper? Increase the reach of your titles
YUMPU automatically turns print PDFs into web optimized ePapers that Google loves.
Using the Main MenuBackup to use the hard drive for databackup only. Click OK.ATT<strong>EN</strong>TION: This step will format thehard drive. Formatting the HDD erasesall data on the hard disk. This stepcannot be undone.SelectStorage orBackup2. Check Enable to enable warnings for theselected Event Type.3. Configure the following actions that will betaken when errors occur:• Show Message: Check to show pop-upwindow with information related to theerror.• Send Email: Check to enable emailmessage. You must configure email alertsbefore you will be able to receive them.• Buzzer: Check to enable system buzzer.4. Click Save to save changes.Record7. The NVR formats the hard drive andrestarts. If you set the external hard drivefor Storage, you may configure it forMirroring or Read only mode the same wayyou would configure one of the internalhard drives (see “Selecting Hard DriveTypes” on page 32).WarningThe Warning sub-menu allows you toconfigure actions taken when system errorsoccur.To configure system error actions:1. Under Event Type, select one of thefollowing system errors to configure: NoDisk, Disk Error, Disk No Space, NetDisconnection, IP Conflicted, or MACConflicted.The Record menu is used control manualrecording for connected cameras.The Record menu is divided into the followingsections.• The Record Mode section defines settingsfor the main (high quality) recordingstream.• The Extra Stream section defines settingsfor an optional lower quality recordingstream. This is useful because you canrecord the Extra Stream to the hard driveand stream it for playback to remote34