DNR200V_SERIES_MANUAL_EN_R1_web - Digimerge
DNR200V_SERIES_MANUAL_EN_R1_web - Digimerge
DNR200V_SERIES_MANUAL_EN_R1_web - Digimerge
- No tags were found...

You also want an ePaper? Increase the reach of your titles
YUMPU automatically turns print PDFs into web optimized ePapers that Google loves.
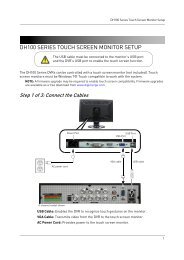
Appendix B: Setting up Remote ViewingAPP<strong>EN</strong>DIX B: SETTING UP REMOTEVIEWINGSetting up the Remote Viewing Feature requires several steps. Networking skills are required tocorrectly configure the remote viewing functions.What Do I Need?• NVR System.• A PC with the installed CMS software.NOTE: For Mac users, please visit www.digimerge.com for instructions.• A router (not provided with the system) and High Speed Cable or DSL Internet Connectivity(for remote viewing outside your network).Network Setup / Remote Access OverviewTo setup remote viewing:1. With the system powered off, connect the system to the router using an Ethernet cable.NVR*INTERNETROUTER(Not Included)PC(Not Included)2. Power the system on.3. Press the Enter button on the remote control to find your system's IP address.4. Enable Port Forwarding on your router for the Client (default: 35000) and HTTP Ports(default: 80). To set up port forwarding, use the included Auto Port Forwarding Wizardsoftware (see “Appendix C: Auto Port Forwarding Wizard” on page 90) or refer to your routermanufacturer’s instructions.5. Setup an account at http://ddns.digimerge.net . For details, see “Appendix D: Setting UpDDNS Service” on page 97.87