
You also want an ePaper? Increase the reach of your titles
YUMPU automatically turns print PDFs into web optimized ePapers that Google loves.
Toyota/Lexus OBD1 Systems<br />
CODE RETRIEVAL PROCEDURE<br />
1. Locate the vehicle's Data Link Connector (DLC). See Data Link<br />
Connector (DLC) on page 106 for connection location.<br />
Some DLCs have a plastic cover that must be removed before<br />
connecting the CanOBD2&1 <strong>Scan</strong> <strong>Tool</strong>'s cable connector.<br />
2. Connect the CanOBD2&1 <strong>Scan</strong> <strong>Tool</strong> cable (with the Toyota<br />
Connector Cable Adaptor attached) to the CanOBD2&1 <strong>Scan</strong><br />
<strong>Tool</strong>, then connect the adaptor to the vehicle’s DLC. Press the<br />
POWER/LINK button to turn the CanOBD2&1 <strong>Scan</strong> <strong>Tool</strong><br />
ON.<br />
3. Turn ignition ON and start engine. Warm engine to operating<br />
temperature. (Shut engine off after warm up).<br />
4. When prompted by the CanOBD2&1 <strong>Scan</strong> <strong>Tool</strong>, do the following<br />
before proceeding to step 5:<br />
� Turn ignition ON. DO NOT start the<br />
engine.<br />
� Make sure throttle is closed.<br />
� Set gear lever in "park" (for<br />
�<br />
automatic transmissions) or “neutral”<br />
for manual transmissions.<br />
Turn off all accessories.<br />
5. Press the ENTER/LD button to continue.<br />
� The CanOBD2&1 <strong>Scan</strong> <strong>Tool</strong> will begin the code retrieval<br />
process.<br />
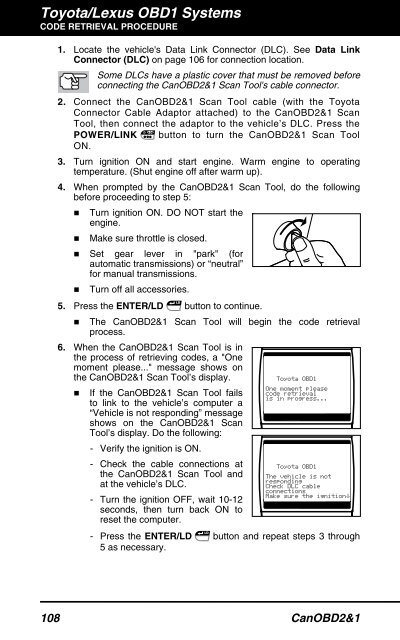
6. When the CanOBD2&1 <strong>Scan</strong> <strong>Tool</strong> is in<br />
the process of retrieving codes, a "One<br />
moment please..." message shows on<br />
the CanOBD2&1 <strong>Scan</strong> <strong>Tool</strong>’s display.<br />
� If the CanOBD2&1 <strong>Scan</strong> <strong>Tool</strong> fails<br />
to link to the vehicle’s computer a<br />
“Vehicle is not responding” message<br />
shows on the CanOBD2&1 <strong>Scan</strong><br />
<strong>Tool</strong>’s display. Do the following:<br />
- Verify the ignition is ON.<br />
- Check the cable connections at<br />
the CanOBD2&1 <strong>Scan</strong> <strong>Tool</strong> and<br />
at the vehicle’s DLC.<br />
- Turn the ignition OFF, wait 10-12<br />
seconds, then turn back ON to<br />
reset the computer.<br />
- Press the ENTER/LD button and repeat steps 3 through<br />
5 as necessary.<br />
108 CanOBD2&1