
You also want an ePaper? Increase the reach of your titles
YUMPU automatically turns print PDFs into web optimized ePapers that Google loves.
OBD2 Live Data Mode<br />
RECORDING (CAPTURING) LIVE DATA<br />
�<br />
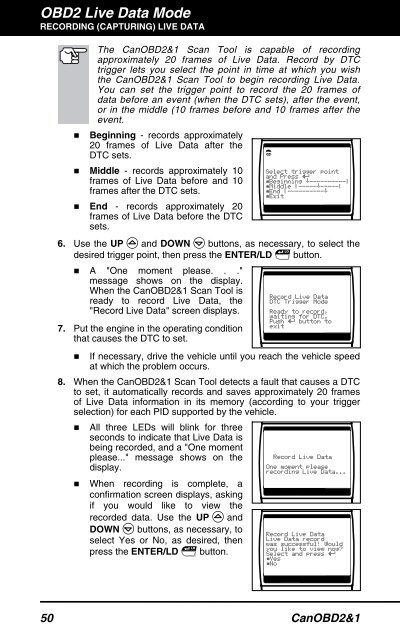
The CanOBD2&1 <strong>Scan</strong> <strong>Tool</strong> is capable of recording<br />
approximately 20 frames of Live Data. Record by DTC<br />
trigger lets you select the point in time at which you wish<br />
the CanOBD2&1 <strong>Scan</strong> <strong>Tool</strong> to begin recording Live Data.<br />
You can set the trigger point to record the 20 frames of<br />
data before an event (when the DTC sets), after the event,<br />
or in the middle (10 frames before and 10 frames after the<br />
event.<br />
Beginning - records approximately<br />
20 frames of Live Data after the<br />
DTC sets.<br />
� Middle - records approximately 10<br />
frames of Live Data before and 10<br />
frames after the DTC sets.<br />
� End - records approximately 20<br />
frames of Live Data before the DTC<br />
sets.<br />
6. Use the UP and DOWN buttons, as necessary, to select the<br />
desired trigger point, then press the ENTER/LD button.<br />
� A "One moment please. . ."<br />
message shows on the display.<br />
When the CanOBD2&1 <strong>Scan</strong> <strong>Tool</strong> is<br />
ready to record Live Data, the<br />
"Record Live Data" screen displays.<br />
7. Put the engine in the operating condition<br />
that causes the DTC to set.<br />
� If necessary, drive the vehicle until you reach the vehicle speed<br />
at which the problem occurs.<br />
8. When the CanOBD2&1 <strong>Scan</strong> <strong>Tool</strong> detects a fault that causes a DTC<br />
to set, it automatically records and saves approximately 20 frames<br />
of Live Data information in its memory (according to your trigger<br />
selection) for each PID supported by the vehicle.<br />
� All three LEDs will blink for three<br />
seconds to indicate that Live Data is<br />
being recorded, and a "One moment<br />
please..." message shows on the<br />
display.<br />
� When recording is complete, a<br />
confirmation screen displays, asking<br />
if you would like to view the<br />
recorded data. Use the UP and<br />
DOWN buttons, as necessary, to<br />
select Yes or No, as desired, then<br />
press the ENTER/LD button.<br />
50 CanOBD2&1