
Create successful ePaper yourself
Turn your PDF publications into a flip-book with our unique Google optimized e-Paper software.
VIEWING LIVE DATA<br />
OBD2 Live Data Mode<br />
VIEWING LIVE DATA<br />
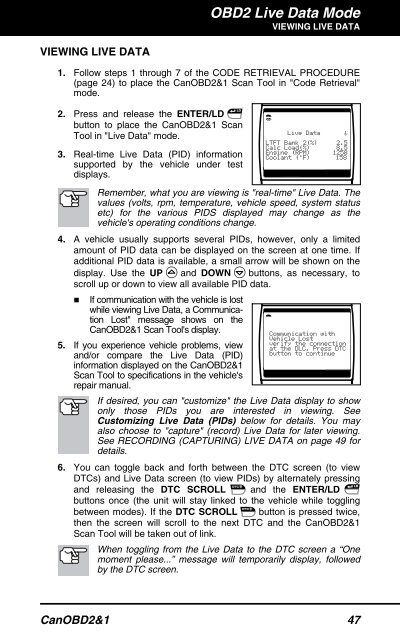
1. Follow steps 1 through 7 of the CODE RETRIEVAL PROCEDURE<br />
(page 24) to place the CanOBD2&1 <strong>Scan</strong> <strong>Tool</strong> in "Code Retrieval"<br />
mode.<br />
2. Press and release the ENTER/LD<br />
button to place the CanOBD2&1 <strong>Scan</strong><br />
<strong>Tool</strong> in "Live Data" mode.<br />
3. Real-time Live Data (PID) information<br />
supported by the vehicle under test<br />
displays.<br />
Remember, what you are viewing is "real-time" Live Data. The<br />
values (volts, rpm, temperature, vehicle speed, system status<br />
etc) for the various PIDS displayed may change as the<br />
vehicle's operating conditions change.<br />
4. A vehicle usually supports several PIDs, however, only a limited<br />
amount of PID data can be displayed on the screen at one time. If<br />
additional PID data is available, a small arrow will be shown on the<br />
display. Use the UP and DOWN buttons, as necessary, to<br />
scroll up or down to view all available PID data.<br />
� If communication with the vehicle is lost<br />
while viewing Live Data, a Communication<br />
Lost" message shows on the<br />
CanOBD2&1 <strong>Scan</strong> <strong>Tool</strong>'s display.<br />
5. If you experience vehicle problems, view<br />
and/or compare the Live Data (PID)<br />
information displayed on the CanOBD2&1<br />
<strong>Scan</strong> <strong>Tool</strong> to specifications in the vehicle's<br />
repair manual.<br />
If desired, you can "customize" the Live Data display to show<br />
only those PIDs you are interested in viewing. See<br />
Customizing Live Data (PIDs) below for details. You may<br />
also choose to "capture" (record) Live Data for later viewing.<br />
See RECORDING (CAPTURING) LIVE DATA on page 49 for<br />
details.<br />
6. You can toggle back and forth between the DTC screen (to view<br />
DTCs) and Live Data screen (to view PIDs) by alternately pressing<br />
and releasing the DTC SCROLL and the ENTER/LD<br />
buttons once (the unit will stay linked to the vehicle while toggling<br />
between modes). If the DTC SCROLL button is pressed twice,<br />
then the screen will scroll to the next DTC and the CanOBD2&1<br />
<strong>Scan</strong> <strong>Tool</strong> will be taken out of link.<br />
When toggling from the Live Data to the DTC screen a “One<br />
moment please...” message will temporarily display, followed<br />
by the DTC screen.<br />
CanOBD2&1 47