You also want an ePaper? Increase the reach of your titles
YUMPU automatically turns print PDFs into web optimized ePapers that Google loves.
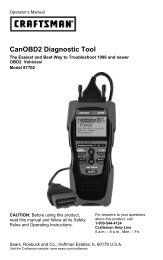
CanOBD2&1 <strong>Scan</strong> <strong>Tool</strong> Controls<br />
CONTROLS AND INDICATORS<br />
4. ENTER/LIVE DATA button - When in MENU mode, confirms<br />
the selected option or value. When linked to a vehicle, places the<br />
CanOBD2&1 <strong>Scan</strong> <strong>Tool</strong> in "Live Data" mode.<br />
5. DOWN button - When in MENU mode, scrolls DOWN through<br />
the menu and submenu selection options. When retrieving and<br />
viewing DTCs, scrolls down through the current display screen to<br />
display any additional data.<br />
6. UP button - When in MENU mode, scrolls UP through the menu<br />
and submenu selection options. When retrieving and viewing DTCs,<br />
scrolls ups through the current display screen to display any<br />
additional data.<br />
7. GREEN LED - Indicates that all engine systems are running<br />
normally (all Monitors on the vehicle are active and performing their<br />
diagnostic testing, and no DTCs are present). (Monitors are<br />
applicable to OBD2 systems only.)<br />
8. YELLOW LED - Indicates there is a possible problem. A “Pending”<br />
or a history DTC is present and/or some of the vehicle’s emission<br />
monitors have not run their diagnostic testing. (Monitors and<br />
pending DTCs are applicable to OBD2 systems only.)<br />
9. RED LED - Indicates there is a problem in one or more of the<br />
vehicle’s systems. The red LED is also used to show that DTC(s)<br />
are present. DTCs are shown on the CanOBD2&1 <strong>Scan</strong> <strong>Tool</strong>’s<br />
display. In this case, the Malfunction Indicator (“Check Engine”)<br />
lamp on the vehicle’s instrument panel will light steady on.<br />
10. Display - Displays Setup Menu and submenus, test results,<br />
CanOBD2&1 <strong>Scan</strong> <strong>Tool</strong> functions and Monitor status information.<br />
See DISPLAY FUNCTIONS, on next page, for more details.<br />
(Monitors are applicable to OBD2 systems only.)<br />
11. Cable - Connects the CanOBD2&1 <strong>Scan</strong> <strong>Tool</strong> to the vehicle’s Data<br />
Link Connector (DLC) when retrieving codes from OBD I systems<br />
(used with items 12, 13, 14 and 16).<br />
12. CHRYSLER Connector Cable Adaptor - Installs on cable (item 11)<br />
when connecting to a Chrysler OBD1 Data Link Connector.<br />
13. FORD Connector Cable Adaptor - Installs on cable (item 11) when<br />
connecting to a Ford OBD1 Data Link Connector.<br />
14. GM Connector Cable Adaptor - Installs on cable (item 11) when<br />
connecting to a GM OBD1 Data Link Connector.<br />
15. OBD II Cable - Connects the CanOBD2&1 <strong>Scan</strong> <strong>Tool</strong> to the<br />
vehicle's Data Link Connector (DLC) when retrieving codes from<br />
OBD II systems.<br />
16. TOYOTA Connector Cable Adaptor - Installs on cable (item 11)<br />
when connecting to a Toyota OBD1 Data Link Connector.<br />
CanOBD2&1 11