
Create successful ePaper yourself
Turn your PDF publications into a flip-book with our unique Google optimized e-Paper software.
OBD2 Live Data Mode<br />
LIVE DATA PLAYBACK<br />
9. You can exit the "Record Live Data Mode" at any time by pressing<br />
and holding the ENTER/LD button until the "Mode Selection<br />
Menu" displays.<br />
If desired, you can transfer the recorded Live Data information<br />
to a personal computer using the optional PC-LINK program<br />
(see instructions included with PC-Link for more information).<br />
Important Information<br />
1. When Live Data capture is complete, the green, yellow and red LEDs<br />
on the CanOBD2&1 <strong>Scan</strong> <strong>Tool</strong> will flash four times to indicate that<br />
Live Data is being saved to the CanOBD2&1 <strong>Scan</strong> <strong>Tool</strong>'s memory.<br />
2. When you are LINKED to a vehicle and you are in the “Live Data<br />
View mode”, you can toggle between “Live Data View” mode and<br />
“DTC view” mode by alternately pressing and releasing the DTC<br />
SCROLL or the ENTER/LD buttons. The CanOBD2&1<br />
<strong>Scan</strong> <strong>Tool</strong> will stay linked to the vehicle’s computer during this<br />
process. However, if the DTC SCROLL button is pressed twice<br />
the DTC screen will be advanced to the next DTC screen and the<br />
CanOBD2&1 <strong>Scan</strong> <strong>Tool</strong> will be taken out of link.<br />
LIVE DATA PLAYBACK<br />
Once Live Data has been recorded, it is saved in the CanOBD2&1 <strong>Scan</strong><br />
<strong>Tool</strong>'s memory. You can view recorded Live Data immediately after<br />
recording by selecting Yes from the Record Live Data confirmation<br />
screen (see RECORDING (CAPTURING) LIVE DATA on page 49 for<br />
more information), or you can view it later using the "Playback" function.<br />
1. If the Code Reader is connected to a vehicle:<br />
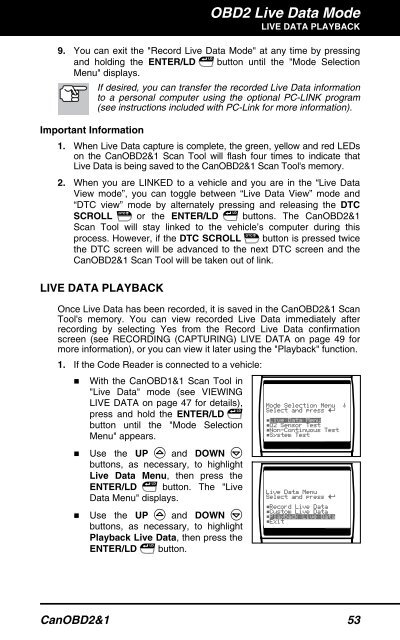
� With the CanOBD1&1 <strong>Scan</strong> <strong>Tool</strong> in<br />
"Live Data" mode (see VIEWING<br />
LIVE DATA on page 47 for details),<br />
press and hold the ENTER/LD<br />
button until the "Mode Selection<br />
Menu" appears.<br />
� Use the UP and DOWN<br />
buttons, as necessary, to highlight<br />
Live Data Menu, then press the<br />
ENTER/LD button. The "Live<br />
Data Menu" displays.<br />
� Use the UP and DOWN<br />
buttons, as necessary, to highlight<br />
Playback Live Data, then press the<br />
ENTER/LD button.<br />
CanOBD2&1 53