Version 5.3.02 - Serendipity Software
Version 5.3.02 - Serendipity Software
Version 5.3.02 - Serendipity Software

You also want an ePaper? Increase the reach of your titles
YUMPU automatically turns print PDFs into web optimized ePapers that Google loves.
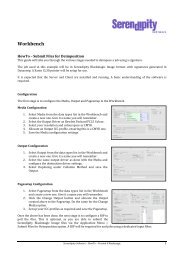
Starting the Client <br />
Once the Server has completed initialisation the Client application can be opened. <br />
1. Launch the Client by double clicking the <strong>Serendipity</strong> Client file in the install directory, or the <br />
shortcut desktop/dock icon. <br />
The Client will connect to the active Server and display the default monitoring system -‐ Jobs -‐ on screen. From this <br />
point, configuration of the system or loading a pre-‐configured setup can be done. <br />
2. Choose Server Menu > Server Settings (Preferences). <br />
3. Select the Colour Management tab. <br />
4. Click on Change System Specials and select Reference-‐Lab (or your own specials) and click OK. <br />
5. Click OK to dismiss the System Settings window and apply the changes. <br />
Manual Client Configuration <br />
This section will explain how to setup a basic configuration in order to process and output a file for proofing and <br />
monitor the job throughout the process. For detailed information on specific modules mentioned, see the relevant <br />
sections of the user manual. <br />
The default monitoring application – Jobs – opens with a factory standard layout, including the QueueManager, <br />
Thumbnail and QueueStatus modules. System queues (Image, Render, Spool and AutoDetect) will be displayed in the <br />
QueueManager. <br />
There are four (4) sections that need configuring in order to process jobs. These are (in no particular order): <br />
• A RIP where the jobs are polled; <br />
• A Pagesetup and Media where jobs are processed; and <br />
• An Output where the <strong>Serendipity</strong> Blackmagic Image or Remote Proof file is sent. <br />
Note: Before a Pagesetup can be created first create a Media and an Output, as each Pagesetup must be linked to a valid <br />
one of each. <br />
To begin configuration: <br />
1. Select Application menu > Workbench. <br />
Output Configuration <br />
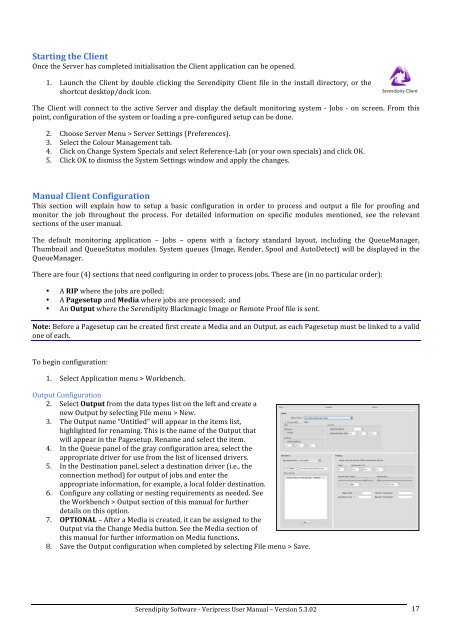
2. Select Output from the data types list on the left and create a <br />
new Output by selecting File menu > New. <br />
3. The Output name “Untitled” will appear in the items list, <br />
highlighted for renaming. This is the name of the Output that <br />
will appear in the Pagesetup. Rename and select the item. <br />
4. In the Queue panel of the gray configuration area, select the <br />
appropriate driver for use from the list of licensed drivers. <br />
5. In the Destination panel, select a destination driver (i.e., the <br />
connection method) for output of jobs and enter the <br />
appropriate information, for example, a local folder destination. <br />
6. Configure any collating or nesting requirements as needed. See <br />
the Workbench > Output section of this manual for further <br />
details on this option. <br />
7. OPTIONAL – After a Media is created, it can be assigned to the <br />
Output via the Change Media button. See the Media section of <br />
this manual for further information on Media functions. <br />
8. Save the Output configuration when completed by selecting File menu > Save. <br />
<strong>Serendipity</strong> <strong>Software</strong> -‐ Veripress User Manual – <strong>Version</strong> <strong>5.3.02</strong> <br />
17