Version 5.3.02 - Serendipity Software
Version 5.3.02 - Serendipity Software
Version 5.3.02 - Serendipity Software

You also want an ePaper? Increase the reach of your titles
YUMPU automatically turns print PDFs into web optimized ePapers that Google loves.
o Custom – Type in the field provided or use the slider to enter a custom temperature in Kelvin (K). <br />
o D50 – Sets the white point to D50 (5003 K/Horizon Light). <br />
o D65 – Sets the white point to D65 (6504 K/Noon Light). <br />
o Native – Sets the Displays application to use the monitors native white point. <br />
• Gamma – Select the gamma correction to be used for the monitor. <br />
o Custom – Type in the field provided or use the slider to enter a custom gamma value between 1.0 and <br />
2.6. The Custom button will auto-‐select if a non-‐standard gamma setting is chosen. Note: If either 1.8 <br />
or 2.2 are chosen, the 1.8 or 2.2 buttons will auto-‐select. <br />
o 1.8 – Select this to set the gamma correction value to 1.8. This button will auto-‐select if 1.8 is chosen <br />
via the Custom field/slider option. <br />
o 2.2 – Select this to set the gamma correction value to 2.2. This button will auto-‐select if 2.2 is chosen <br />
via the Custom field/slider option. <br />
• Options <br />
o Use Hardware Calibration – When supported, this option uses the monitor’s own internal hardware <br />
for calibration. <br />
o Use <strong>Software</strong> Calibration – Calibration is performed using the Displays application software. <br />
• Instrument (offline/online) / Instrument Name – Displays <br />
the currently activated instrument. <br />
o Instrument – Select from the list of supported <br />
Spectrophotometers to use for display calibration. <br />
o Display Type – Select the type of display being <br />
calibrated from LCD, CRT or RAW. <br />
• Monitor Identification Number – Click to popup an identification number in the centre of the screen for the <br />
display to be calibrated. <br />
• Calibrate – Click this button to start calibrating the selected display to the chosen settings and create the <br />
display ICC profile. Follow any onscreen instructions for your instrument. When calibration is complete, a file <br />
chooser will popup to name and save the ICC profile. The profile will be saved as the operating system native <br />
ICC profile for the display and will appear as the Native Profile in <strong>Serendipity</strong> Client Preferences > Colour <br />
Management (see System Settings for more information). <br />
• Save Profile – Opens a file chooser (as above) to save or rename the ICC profile. <br />
• Information Panel – Appears while the ICC profile is being generated, showing the progress and final results of <br />
the calibration process. <br />
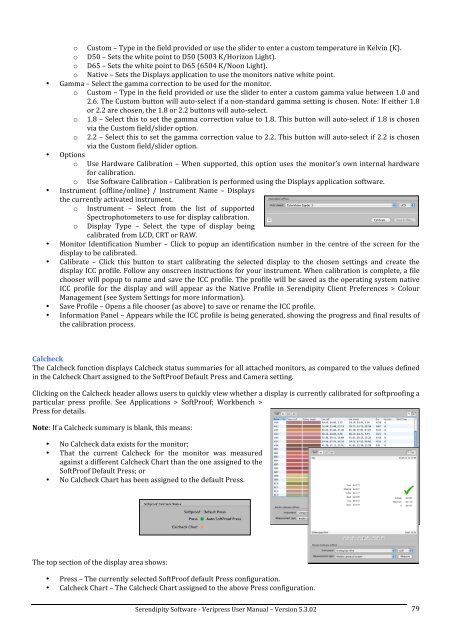
Calcheck <br />
The Calcheck function displays Calcheck status summaries for all attached monitors, as compared to the values defined <br />
in the Calcheck Chart assigned to the SoftProof Default Press and Camera setting. <br />
Clicking on the Calcheck header allows users to quickly view whether a display is currently calibrated for softproofing a <br />
particular press profile. See Applications > SoftProof; Workbench > <br />
Press for details. <br />
Note: If a Calcheck summary is blank, this means: <br />
• No Calcheck data exists for the monitor; <br />
• That the current Calcheck for the monitor was measured <br />
against a different Calcheck Chart than the one assigned to the <br />
SoftProof Default Press; or <br />
• No Calcheck Chart has been assigned to the default Press. <br />
The top section of the display area shows: <br />
• Press – The currently selected SoftProof default Press configuration. <br />
• Calcheck Chart – The Calcheck Chart assigned to the above Press configuration. <br />
<strong>Serendipity</strong> <strong>Software</strong> -‐ Veripress User Manual – <strong>Version</strong> <strong>5.3.02</strong> <br />
79