Version 5.3.02 - Serendipity Software
Version 5.3.02 - Serendipity Software
Version 5.3.02 - Serendipity Software

Create successful ePaper yourself
Turn your PDF publications into a flip-book with our unique Google optimized e-Paper software.
Menu Options <br />
Application <br />
• Access all available Applications via this menu. Each application will open in its own separate window. <br />
• System Settings (Windows OS) – Access the System Settings (Preferences) for the <strong>Serendipity</strong> Client. This <br />
option is available under the <strong>Serendipity</strong> Client menu for Mac OS X users. <br />
• Quit (Windows OS) – Quits the <strong>Serendipity</strong> Client application. This option is available under the <strong>Serendipity</strong> <br />
Client menu for Mac OS X users. <br />
Submit <br />
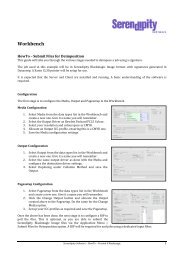
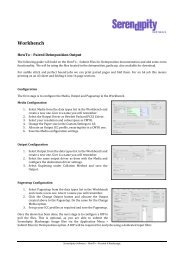
• Files – Select files to send to a Media and Pagesetup for processing. <br />
• Files for Deimposition – Submit files directly for de-‐imposition, assigning the files to one or more imposition <br />
signatures. <br />
• Files As Imposition – Submit files directly as an imposition, assigning the files to one or more imposition <br />
signatures. This option is only available for Veripress/Blackmagic Softproofing Add-‐On and allows jobs to be <br />
de-‐imposed on the fly (see Touch Console for details). <br />
• ICC Target – Submit an ICC Target to a selected Media and Pagesetup. <br />
• ICC Target without Colour correction – Submit an ICC Target to a selected Media and Pagesetup. All ICC options <br />
and colour correction curves are disabled. <br />
• Test Prints – Select one or more Media and Pagesetups to send internal test prints for processing. <br />
File <br />
• New – Create a new item in the database. <br />
• Save – Save changes to the database. <br />
• Duplicate – Make a copy of the currently selected item. <br />
• Revert – Reload the last saved version of the currently selected item. <br />
• Delete – Delete the currently selected item. <br />
• Print – Print the details of the currently selected item. <br />
• Get Info – Displays a popup window with two panels – General & Ownership. General displays the type, created <br />
and modified dates for the selected item. Ownership displays the User and User Group permissions for the <br />
item. <br />
• Show Orphans – Shows any item currently in the database not being used by a Pagesetup or RIP. <br />
• Add to Archive – Add the selected items into a new Archive window. See the Archives section for further <br />
information. <br />
• Export as C5 Pack – Allows users to export Media files from the Workbench to a specified location for use with <br />
the C5 application (Generally used with Blackmagic & Megarip products). <br />
• Export / Import Folders – Allows users to export or import the folder structure used within the workbench. It <br />
will not import or export the contents. <br />
Edit <br />
• Undo – Undo the last change. There are multiple undo options and this is configured via the Client Settings <br />
section. <br />
• Redo – Redo the last undone change. There are multiple redo options, depending on the undo status and <br />
configuration in the Client Settings. <br />
• Find – Opens a text box at the bottom of the Workbench panel to locate the search text on the screen. <br />
View <br />
• Split Vertical/Horizontal – Changes the view to either Vertical or Horizontal split on the screen. <br />
• Show Type Column – Used in conjunction with Show Usage to display the type of data listed. <br />
• Show Modified Time Column – Displays the last modified time for the items listed. <br />
• Show Usage – Displays the items within the database the currently selected item uses, e.g., a selected Pagesetup <br />
would show the Media and Output it currently uses. <br />
• Reverse Usage – Reverses the usage shown above. (Was called Show Referrers previously). <br />
• Organise Data Types – When enabled, this option will organise the Data Types in the Workbench list into <br />
related categories. This is the default view. <br />
Modules <br />
• Access all available Modules via this menu. A floating window will open for each separate module opened. <br />
Server <br />
• Server Settings – Access the System Settings or Preferences for the Veripress Server. <br />
• Connect to Server – Select a Veripress Server to connect to on the available network. <br />
<strong>Serendipity</strong> <strong>Software</strong> -‐ Veripress User Manual – <strong>Version</strong> <strong>5.3.02</strong> <br />
25