Version 5.3.02 - Serendipity Software
Version 5.3.02 - Serendipity Software
Version 5.3.02 - Serendipity Software

You also want an ePaper? Increase the reach of your titles
YUMPU automatically turns print PDFs into web optimized ePapers that Google loves.
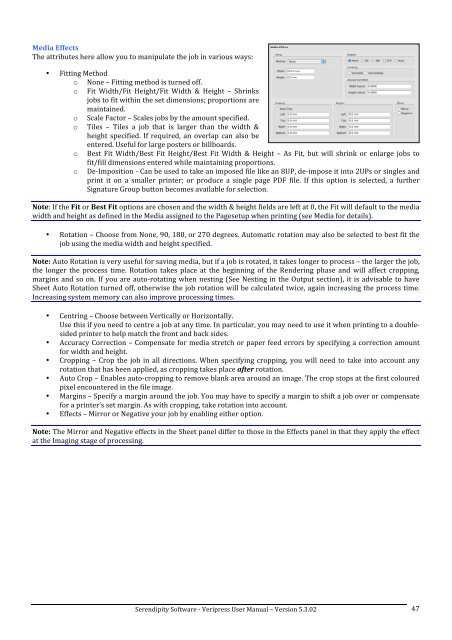
Media Effects <br />
The attributes here allow you to manipulate the job in various ways: <br />
• Fitting Method <br />
o None – Fitting method is turned off. <br />
o Fit Width/Fit Height/Fit Width & Height – Shrinks <br />
jobs to fit within the set dimensions; proportions are <br />
maintained. <br />
o Scale Factor – Scales jobs by the amount specified. <br />
o Tiles – Tiles a job that is larger than the width & <br />
height specified. If required, an overlap can also be <br />
entered. Useful for large posters or billboards. <br />
o Best Fit Width/Best Fit Height/Best Fit Width & Height – As Fit, but will shrink or enlarge jobs to <br />
fit/fill dimensions entered while maintaining proportions. <br />
o De-‐Imposition -‐ Can be used to take an imposed file like an 8UP, de-‐impose it into 2UPs or singles and <br />
print it on a smaller printer; or produce a single page PDF file. If this option is selected, a further <br />
Signature Group button becomes available for selection. <br />
Note: If the Fit or Best Fit options are chosen and the width & height fields are left at 0, the Fit will default to the media <br />
width and height as defined in the Media assigned to the Pagesetup when printing (see Media for details). <br />
• Rotation – Choose from None, 90, 180, or 270 degrees. Automatic rotation may also be selected to best fit the <br />
job using the media width and height specified. <br />
Note: Auto Rotation is very useful for saving media, but if a job is rotated, it takes longer to process – the larger the job, <br />
the longer the process time. Rotation takes place at the beginning of the Rendering phase and will affect cropping, <br />
margins and so on. If you are auto-‐rotating when nesting (See Nesting in the Output section), it is advisable to have <br />
Sheet Auto Rotation turned off, otherwise the job rotation will be calculated twice, again increasing the process time. <br />
Increasing system memory can also improve processing times. <br />
• Centring – Choose between Vertically or Horizontally. <br />
Use this if you need to centre a job at any time. In particular, you may need to use it when printing to a double-sided<br />
printer to help match the front and back sides. <br />
• Accuracy Correction – Compensate for media stretch or paper feed errors by specifying a correction amount <br />
for width and height. <br />
• Cropping – Crop the job in all directions. When specifying cropping, you will need to take into account any <br />
rotation that has been applied, as cropping takes place after rotation. <br />
• Auto Crop – Enables auto-‐cropping to remove blank area around an image. The crop stops at the first coloured <br />
pixel encountered in the file image. <br />
• Margins – Specify a margin around the job. You may have to specify a margin to shift a job over or compensate <br />
for a printer’s set margin. As with cropping, take rotation into account. <br />
• Effects – Mirror or Negative your job by enabling either option. <br />
Note: The Mirror and Negative effects in the Sheet panel differ to those in the Effects panel in that they apply the effect <br />
at the Imaging stage of processing. <br />
<strong>Serendipity</strong> <strong>Software</strong> -‐ Veripress User Manual – <strong>Version</strong> <strong>5.3.02</strong> <br />
47