Download the ezAccess ® User Guide - Windstream Business ...
Download the ezAccess ® User Guide - Windstream Business ...
Download the ezAccess ® User Guide - Windstream Business ...

You also want an ePaper? Increase the reach of your titles
YUMPU automatically turns print PDFs into web optimized ePapers that Google loves.
Access Service Requests<br />
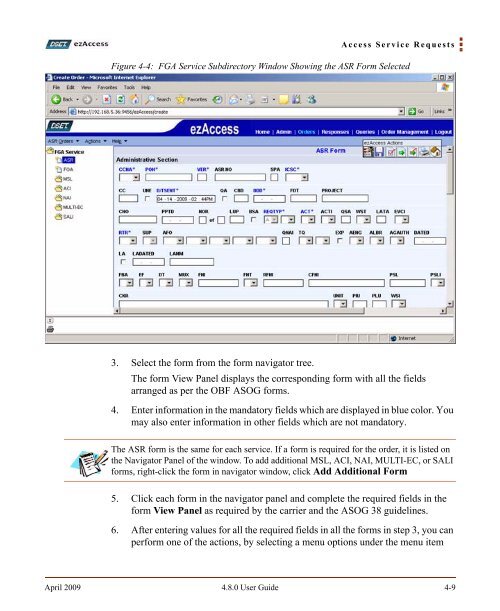
Figure 4-4: FGA Service Subdirectory Window Showing <strong>the</strong> ASR Form Selected<br />
3. Select <strong>the</strong> form from <strong>the</strong> form navigator tree.<br />
The form View Panel displays <strong>the</strong> corresponding form with all <strong>the</strong> fields<br />
arranged as per <strong>the</strong> OBF ASOG forms.<br />
4. Enter information in <strong>the</strong> mandatory fields which are displayed in blue color. You<br />
may also enter information in o<strong>the</strong>r fields which are not mandatory.<br />
The ASR form is <strong>the</strong> same for each service. If a form is required for <strong>the</strong> order, it is listed on<br />
<strong>the</strong> Navigator Panel of <strong>the</strong> window. To add additional MSL, ACI, NAI, MULTI-EC, or SALI<br />
forms, right-click <strong>the</strong> form in navigator window, click Add Additional Form<br />
5. Click each form in <strong>the</strong> navigator panel and complete <strong>the</strong> required fields in <strong>the</strong><br />
form View Panel as required by <strong>the</strong> carrier and <strong>the</strong> ASOG 38 guidelines.<br />
6. After entering values for all <strong>the</strong> required fields in all <strong>the</strong> forms in step 3, you can<br />
perform one of <strong>the</strong> actions, by selecting a menu options under <strong>the</strong> menu item<br />
April 2009 4.8.0 <strong>User</strong> <strong>Guide</strong> 4-9