- Page 3 and 4:
Contents Chapter 1. Introduction 1
- Page 5 and 6:
Edit Current Aircraft… Helicopter
- Page 7 and 8:
Credits............................
- Page 9 and 10:
CHAPTER 1. INTRODUCTION INTRODUCTIO
- Page 11 and 12:
five wind fields to ensure that the
- Page 13 and 14:
CHAPTER 2. BEFORE YOU BEGIN SYSTEM
- Page 15 and 16:
CHAPTER 3. GETTING STARTED OVERVIEW
- Page 17 and 18:
INSTALLING THE SOFTWARE After you h
- Page 19 and 20:
Locate the cable input port on the
- Page 21 and 22:
Navigating the Menus To access the
- Page 23 and 24:
CHANGING AIRPORTS Changing flying s
- Page 25 and 26:
SOME COMMON TASKS • The easiest m
- Page 27 and 28:
When you select NavGuides, you shou
- Page 29 and 30:
AIRPORT EDITING RealFlight G3 offer
- Page 31 and 32:
CHAPTER 4. USING REALFLIGHT GENERAT
- Page 33 and 34:
allows you to: pause, speed up, slo
- Page 35 and 36:
PHYSICS • RealFlight G3 offers th
- Page 37:
In order for the simulator to work
- Page 40 and 41:
The InterLink Plus Controller Featu
- Page 42 and 43:
• Wind • Settings… • Import
- Page 44 and 45:
this feature and its related functi
- Page 46 and 47:
Alternatively, with the respective
- Page 48 and 49:
PAN CAMERA- The Pan Camera option a
- Page 50 and 51:
OPTIONS MENU- SELECTABLE ITEMS- The
- Page 52 and 53:
ROTATION SNAP- When rotating an obj
- Page 54 and 55:
To determine what items are contain
- Page 56 and 57:
To reduce the magnification, or zoo
- Page 58 and 59:
DESCRIPTION- This is a description
- Page 60 and 61:
To select the location, click the v
- Page 62 and 63:
DETAIL TEXTURE OUTER RADIUS- This v
- Page 64 and 65:
To modify this setting, follow the
- Page 66 and 67:
Additionally, RealFlight will highl
- Page 68 and 69:
CAST SHADOW- This value determines
- Page 70 and 71:
OBJECT LOCATION- (READ ONLY) This v
- Page 72 and 73:
To modify the cloud density, click
- Page 74 and 75:
mouse button. Next, move the mouse
- Page 76 and 77:
FLIGHT FAILURES RealFlight G3 offer
- Page 78 and 79:
WIND RealFlight G3’s TruFlo Wind
- Page 80 and 81:
Alternatively, you may increase the
- Page 82 and 83:
At very high values, the camera har
- Page 84 and 85:
Before Flight - RealFlight will tel
- Page 86 and 87:
PARTICLES- This option determines w
- Page 88 and 89:
HARDWARE- The Hardware settings are
- Page 90 and 91:
PILOT NAME- This setting allows you
- Page 92 and 93:
REMOTE MESSAGE TEXT COLOR- This set
- Page 94 and 95:
UNLIMITED FUEL- This option determi
- Page 96 and 97:
SOUND EFFECT VOLUME (%)- The adjust
- Page 98 and 99:
ADJUSTING THE SHOW AT MOST AND THE
- Page 100 and 101:
To select a color, click the desire
- Page 102 and 103:
• Message Duration (sec) • Enab
- Page 104 and 105:
Thermals are rising air currents us
- Page 106 and 107:
To adjust the Micro-Turbulence Stre
- Page 108 and 109:
AIRPORT MRU If you have previously
- Page 111 and 112:
CHAPTER 7. THE AIRCRAFT MENU AIRCRA
- Page 113 and 114:
Click the [+] (plus) symbol to reve
- Page 115 and 116:
AIRCRAFT EDITOR MENUS Selecting the
- Page 117 and 118:
Click Yes if you wish to return to
- Page 119 and 120:
OPTIONS MENU- This menu provides yo
- Page 121 and 122:
To alter the Description, click the
- Page 123 and 124:
To change the Radio Type, click on
- Page 125 and 126:
column moves the CG towards the fro
- Page 127 and 128:
ADD SYMMETRICAL ITEM SELECTIONS- Ad
- Page 129 and 130:
FRONTAL DRAG (%) - This value repre
- Page 131 and 132:
Once you have added a component, yo
- Page 133 and 134:
If it is a ducted fan unit, select
- Page 135 and 136:
To select a sound profile, click th
- Page 137 and 138:
Fuel Consumption- This value repres
- Page 139 and 140:
Graphical Adjustment- Rather than e
- Page 141 and 142:
Rename- This option is utilized to
- Page 143 and 144:
LOCATION IN PARENT- This value repr
- Page 145 and 146:
To select the servo, click the valu
- Page 147 and 148:
To select the type of landing gear
- Page 149 and 150:
To adjust the rotational degree abo
- Page 151 and 152:
The various modifications made to t
- Page 153 and 154:
wheel. Larger positive values will
- Page 155 and 156:
RETRACT SERVO- This drop down list
- Page 157 and 158:
STEERING WHEEL- To add a smoke comp
- Page 159 and 160:
It is not possible to manually adju
- Page 161 and 162:
To select an airfoil, click the val
- Page 163 and 164:
To adjust the dihedral, click the e
- Page 165 and 166:
To modify the length of the wing pa
- Page 167 and 168:
To modify the percentage of chord t
- Page 169 and 170:
AIRFOIL AT TIP- This setting determ
- Page 171 and 172:
WASHOUT AT TIP (DEG)- This value di
- Page 173 and 174:
To modify the percentage of chord t
- Page 175 and 176:
To adjust the dihedral, click the e
- Page 177 and 178:
LENGTH- This value represents the l
- Page 179 and 180:
With the aircraft name highlighted,
- Page 181 and 182:
• Unpowered - utilized for sailpl
- Page 183 and 184:
You may add a variety of items to y
- Page 185 and 186:
Clicking on the respective value co
- Page 187 and 188:
ADD OR REMOVE HELI MECHANICS ITEMS-
- Page 189 and 190:
The value of the Y-axis represents
- Page 191 and 192:
MAIN ROTOR COMPONENT These are the
- Page 193 and 194:
Note: if the airfoil at the root is
- Page 195 and 196:
6. Enter the mass used in the weigh
- Page 197 and 198:
esistance from the hubs. For exampl
- Page 199 and 200:
To make your selection, click the r
- Page 201 and 202:
CYCLIC PITCH (LEFT/RIGHT) (DEG) (RE
- Page 203 and 204:
five degrees. Please note: helicopt
- Page 205 and 206:
EXHAUST- If you wish to make modifi
- Page 207 and 208:
To select a servo, click the existi
- Page 209 and 210:
Clicking on the respective value co
- Page 211 and 212: COMPONENT FRAME- This value represe
- Page 213 and 214: AIRFOIL- This setting determines wh
- Page 215 and 216: The X-axis value represents a movem
- Page 217 and 218: AIRFOIL AT ROOT- This setting deter
- Page 219 and 220: LEADING EDGE SWEEP (DEG)- This sett
- Page 221 and 222: To select an airfoil, click the val
- Page 223 and 224: WEIGHT- This indicates the weight o
- Page 225 and 226: CURRENT MASS OF SELF (READ ONLY) -
- Page 227 and 228: You may not manually adjust this va
- Page 229 and 230: INPUT FOR THIS SERVO- This option d
- Page 231 and 232: INPUT 1- This value determines the
- Page 233 and 234: HEADING HOLD MIX- This value contro
- Page 235 and 236: To adjust the gain, click on the ex
- Page 237 and 238: CURRENT OUTPUT (%) (READ ONLY)- The
- Page 239 and 240: Click on the Radio Display to exami
- Page 241 and 242: EXPO DURING HIGH RATES (%)- This va
- Page 243 and 244: To determine which stick, switch or
- Page 245 and 246: To make your selection, click the r
- Page 247 and 248: The servo curve is used to alter th
- Page 249 and 250: To adjust the Min Resonation Speed,
- Page 251 and 252: Alternatively, access the Aircraft
- Page 253 and 254: KILL ENGINE Click on this item to i
- Page 255 and 256: CHAPTER 8. THE CONTROLLER MENU CONT
- Page 257 and 258: With the InterLink Joystick mode se
- Page 259 and 260: It is important to have a basic und
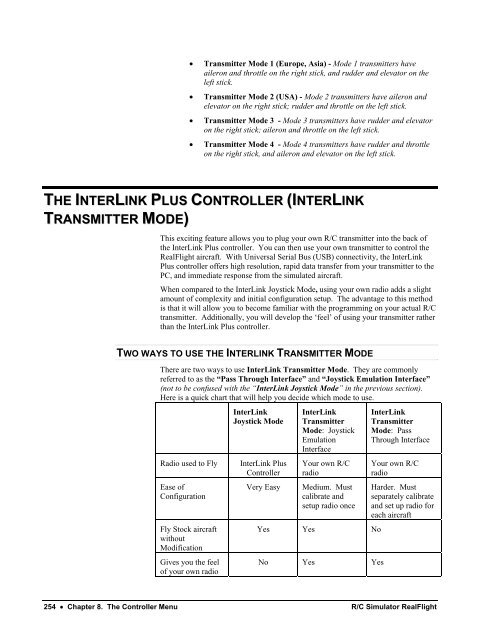
- Page 261: wish to utilize for your flight --
- Page 265 and 266: MAPPING CHANNELS TO SERVOS If any c
- Page 267 and 268: CHAPTER 9. THE EVENTS MENU EVENTS M
- Page 269 and 270: The goal of this event is to land t
- Page 271 and 272: Note: the countdown or timer is ini
- Page 273 and 274: The event continues until the playe
- Page 275 and 276: MINIMUM BAR HEIGHT- This setting de
- Page 277 and 278: The object of limbo is to fly an ai
- Page 279 and 280: SELECTING YOUR NAME FOR THE EVENT I
- Page 281 and 282: PYLON RACING In Pylon Racing, pilot
- Page 283 and 284: To adjust the penalty seconds per c
- Page 285 and 286: EVENTS VIEWPORT DISPLAY BOX During
- Page 287 and 288: TIME TO COMPLETE TURN (SEC)- This i
- Page 289 and 290: OPTIONS The Options… menu item al
- Page 291: • You are the only participant in
- Page 294 and 295: • Host… • Join… • Disconn
- Page 296 and 297: Clicking on the ‘X’ in the view
- Page 298 and 299: JOIN This option allows you to part
- Page 300 and 301: LATENCY- Latency is the amount of t
- Page 302 and 303: To access the MultiMode menu item,
- Page 304 and 305: not you have attached an actual R/C
- Page 306 and 307: Alternatively, after you have activ
- Page 309 and 310: CHAPTER 11. RECORDINGS RECORDINGS M
- Page 311 and 312: Alternatively, you may also press t
- Page 313 and 314:
Playback/Pause- If the recording is
- Page 315 and 316:
By default, G3’s radio gadget app
- Page 317 and 318:
CHAPTER 12. THE VIEW MENU VIEW MENU
- Page 319 and 320:
To access the NavGuides, click the
- Page 321 and 322:
transparent. This provides a visual
- Page 323 and 324:
MODIFYING THE NAVGUIDES- To add any
- Page 325 and 326:
Wind Direction Wind Speed Wind Updr
- Page 327 and 328:
CHASE- The Chase mode positions the
- Page 329 and 330:
Click on the viewport that you wish
- Page 331 and 332:
Click on the viewport that you wish
- Page 333 and 334:
CHAPTER 13. THE WINDOW MENU WINDOW
- Page 335 and 336:
CLOSE ALL This menu item closes all
- Page 337 and 338:
CHAPTER 14. THE HELP MENU HELP MENU
- Page 339 and 340:
To access the About… files, click
- Page 341 and 342:
Frank Noll, Jr. Pete Niotis Jason S
- Page 343 and 344:
FMOD sound and music system, (C) Fi
- Page 345 and 346:
6. Restrictions Apply to Third Part
- Page 347:
GREAT PLANES - Publishers of RealFl
- Page 350 and 351:
ideal for practicing new maneuvers
- Page 352 and 353:
HELICOPTER BASICS A model helicopte
- Page 354 and 355:
CYCLIC STICK (RIGHT STICK) The cycl
- Page 356 and 357:
IDLE-UP A switch on the controller
- Page 359 and 360:
APPENDIX B. REALFLIGHT G3 LAUNCHER
- Page 361 and 362:
Please enter in all the correct reg
- Page 363 and 364:
UNINSTALL DATA FILES Choose this op
- Page 365 and 366:
ENTER TECHNICAL SUPPORT CODE Choose
- Page 367 and 368:
EXPLORER This button launches Windo
- Page 369 and 370:
APPENDIX C. IF YOU EXPERIENCE DIFFI
- Page 371 and 372:
A driver is a software program that
- Page 373 and 374:
update their drivers to fix this ty
- Page 375 and 376:
GLOSSARY OF TERMS 3D Acceleration 3
- Page 377 and 378:
Chord The chord of a wing or surfac
- Page 379 and 380:
Event An organized flying contest w
- Page 381 and 382:
HAL Device A hardware-accelerated 3
- Page 383 and 384:
Multiplayer Session A network conne
- Page 385 and 386:
or right). Left Rudder movement cau
- Page 387:
VirtualRevolution This is the exclu
- Page 390 and 391:
H Heading..........................


