DI-770 Oscilloscope provides five virtual instruments in one
DI-770 Oscilloscope provides five virtual instruments in one
DI-770 Oscilloscope provides five virtual instruments in one

Create successful ePaper yourself
Turn your PDF publications into a flip-book with our unique Google optimized e-Paper software.
<strong>DI</strong>-<strong>770</strong> and WINDAQ/Scope Manual<br />
When a mouse sensitivity of 10 steps per screen is selected, the available pre trigger positions are 0%, 10%, 20%,<br />
30%, ..., 90% and 100%.<br />
When the mouse sensitivity is set to 100 steps per screen each mouse movement will result <strong>in</strong> a pre trigger value<br />
change of 1%.<br />
Note: The mouse sensitivity does not affect adjust<strong>in</strong>g the pre trigger value by click<strong>in</strong>g the buttons of the scroll bar or<br />
by click<strong>in</strong>g <strong>in</strong> the scrollbar outside the slider.<br />
To set the Mouse sensitivity, enter the Time base menu and select Mouse sensitivity pre trigger position adjustment.<br />
In the menu that pops up, the choices are available.<br />
Magnify<strong>in</strong>g the horizontal axis<br />
The software supports a wide range of record lengths which can all been viewed completely. A special display<strong>in</strong>g<br />
algorithm guarantees that when-ever the record length is larger than the display size, no amplitude <strong>in</strong>formation will<br />
be lost.<br />
To take a closer look at a smaller part of the record, that part can be magnified to fill the screen. This is d<strong>one</strong> with the<br />
record view ga<strong>in</strong>, which is completely variable between 1.0 (full record view) and a value depend<strong>in</strong>g on the <strong>in</strong>strument<br />
w<strong>in</strong>dow width (about 40 - about 80).<br />
Adjust<strong>in</strong>g the record view ga<strong>in</strong> can be d<strong>one</strong> through a menu and by means of the special record view scroll bar.<br />
To change the record view ga<strong>in</strong> by means of a menu, enter the Time base menu and select the Record view ga<strong>in</strong> item.<br />
This will br<strong>in</strong>g up a dialog box <strong>in</strong> which the requested record view ga<strong>in</strong> can be entered. The Time base menu can also<br />
be entered by press<strong>in</strong>g the right mouse button over <strong>one</strong> of the time base controls or read outs.<br />
Sett<strong>in</strong>g the horizontal position of the signal(s)<br />
When a record view ga<strong>in</strong> > 1 is selected, only a part of the record is visible. To view a certa<strong>in</strong> part of the record, a<br />
record view offset can be applied.<br />
Apply<strong>in</strong>g a record view offset can be d<strong>one</strong> by means of the special record view scroll bar and by means of a menu.<br />
To use the menu, enter the Time base menu and select the Record view offset item. A dialog box will appear <strong>in</strong> which<br />
the record view offset can be entered, <strong>in</strong> seconds. When the trigger position is not equal to 0, a negative value will<br />
make pre samples visible, a positive value will make post samples visible. The Time base menu can also be entered<br />
by press<strong>in</strong>g the right mouse button over <strong>one</strong> of the time base controls or read outs.<br />
When the record view ga<strong>in</strong> is equal to 1.0, the Record view offset item is not available <strong>in</strong> the menu.<br />
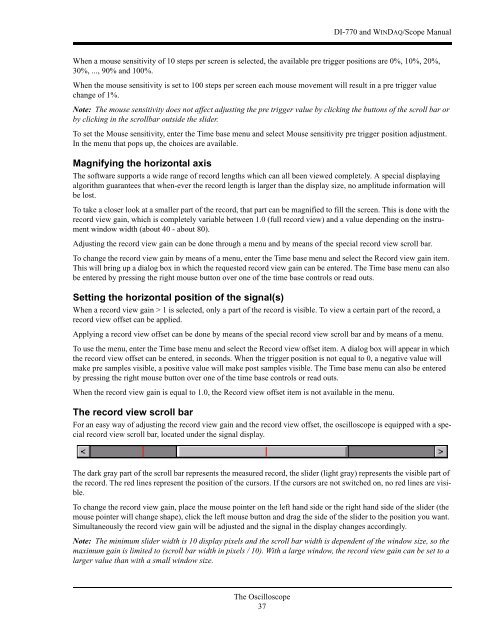
The record view scroll bar<br />
For an easy way of adjust<strong>in</strong>g the record view ga<strong>in</strong> and the record view offset, the oscilloscope is equipped with a special<br />
record view scroll bar, located under the signal display.<br />
The dark gray part of the scroll bar represents the measured record, the slider (light gray) represents the visible part of<br />
the record. The red l<strong>in</strong>es represent the position of the cursors. If the cursors are not switched on, no red l<strong>in</strong>es are visible.<br />
To change the record view ga<strong>in</strong>, place the mouse po<strong>in</strong>ter on the left hand side or the right hand side of the slider (the<br />
mouse po<strong>in</strong>ter will change shape), click the left mouse button and drag the side of the slider to the position you want.<br />
Simultaneously the record view ga<strong>in</strong> will be adjusted and the signal <strong>in</strong> the display changes accord<strong>in</strong>gly.<br />
Note: The m<strong>in</strong>imum slider width is 10 display pixels and the scroll bar width is dependent of the w<strong>in</strong>dow size, so the<br />
maximum ga<strong>in</strong> is limited to (scroll bar width <strong>in</strong> pixels / 10). With a large w<strong>in</strong>dow, the record view ga<strong>in</strong> can be set to a<br />
larger value than with a small w<strong>in</strong>dow size.<br />
The <strong>Oscilloscope</strong><br />
37