DI-770 Oscilloscope provides five virtual instruments in one
DI-770 Oscilloscope provides five virtual instruments in one
DI-770 Oscilloscope provides five virtual instruments in one

Create successful ePaper yourself
Turn your PDF publications into a flip-book with our unique Google optimized e-Paper software.
<strong>DI</strong>-<strong>770</strong> and WINDAQ/Scope Manual<br />
To change the trigger source, enter the Trigger menu and select the Source item. In this menu a source can be<br />
selected. The trigger menu can be found <strong>in</strong> the ma<strong>in</strong> menu and can be called by click<strong>in</strong>g the trigger button (<br />
) or<br />
by press<strong>in</strong>g the right mouse button when the mouse is over <strong>one</strong> of the trigger controls or readouts.<br />
Select<strong>in</strong>g the trigger mode<br />
The trigger system has several trigger modes:<br />
Ris<strong>in</strong>g slope<br />
Fall<strong>in</strong>g slope<br />
trigger on the ris<strong>in</strong>g slope of a signal<br />
trigger on the fall<strong>in</strong>g slope of a signal<br />
To change the trigger mode, enter the Trigger menu and select the Trigger mode item. A menu will popup and a trigger<br />
mode selection can be made. Another way to change the trigger mode is by us<strong>in</strong>g the trigger symbol. Double<br />
click<strong>in</strong>g the left mouse button on the trigger symbol will change the trigger mode from:<br />
Fall<strong>in</strong>g slope to Ris<strong>in</strong>g slope<br />
Ris<strong>in</strong>g slope to Fall<strong>in</strong>g slope<br />
Sett<strong>in</strong>g the trigger level<br />
Adjust<strong>in</strong>g a trigger level can be d<strong>one</strong> is several ways: by means of a menu or by us<strong>in</strong>g the special trigger symbol.<br />
To change a trigger level by means of a menu, enter the Trigger menu and select the Level Ch1 ... or Level Ch2 ...<br />
item. An <strong>in</strong>put dialog appears <strong>in</strong> which the trigger level can be entered, <strong>in</strong> volts.<br />
In this dialog, also a check box for select<strong>in</strong>g auto level trigger<strong>in</strong>g is found. When auto level trigger<strong>in</strong>g is selected, the<br />
trigger level will be set to a value that lies <strong>in</strong> the middle between the highest and the lowest value of the previous<br />
measurement. This can be very useful with cont<strong>in</strong>uously chang<strong>in</strong>g signals. When auto level trigger<strong>in</strong>g is selected, the<br />
trigger symbol will show that with a letter A <strong>in</strong> the symbol. The level can no longer be adjusted with the symbol.<br />
Note: When a trigger source External is selected the trigger level adjustment is disabled.<br />
Sett<strong>in</strong>g the trigger hysteresis<br />
Adjust<strong>in</strong>g a trigger hysteresis can be d<strong>one</strong> <strong>in</strong> several ways: by means of a menu or by us<strong>in</strong>g the special trigger symbol.<br />
To change a trigger hysteresis by means of a menu, enter the Trigger menu and select the Hysteresis Ch1 ... or Hysteresis<br />
Ch2 ... item. An <strong>in</strong>put dialog appears <strong>in</strong> which the trigger hysteresis can be entered, <strong>in</strong> volts.<br />
When auto level trigger<strong>in</strong>g is selected, the trigger symbol will show that with a letter A <strong>in</strong> the symbol. The hysteresis<br />
can still be adjusted with the symbol.<br />
Note: When a trigger source External is selected the trigger hysteresis adjustment is disabled.<br />
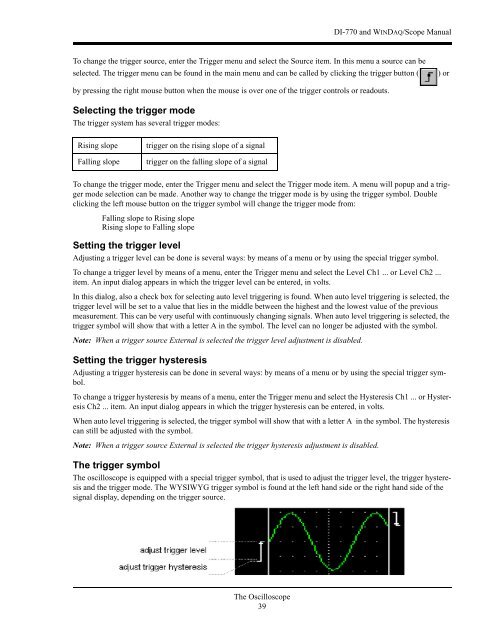
The trigger symbol<br />
The oscilloscope is equipped with a special trigger symbol, that is used to adjust the trigger level, the trigger hysteresis<br />
and the trigger mode. The WYSIWYG trigger symbol is found at the left hand side or the right hand side of the<br />
signal display, depend<strong>in</strong>g on the trigger source.<br />
The <strong>Oscilloscope</strong><br />
39