DI-770 Oscilloscope provides five virtual instruments in one
DI-770 Oscilloscope provides five virtual instruments in one
DI-770 Oscilloscope provides five virtual instruments in one

You also want an ePaper? Increase the reach of your titles
YUMPU automatically turns print PDFs into web optimized ePapers that Google loves.
<strong>DI</strong>-<strong>770</strong> and WINDAQ/Scope Manual<br />
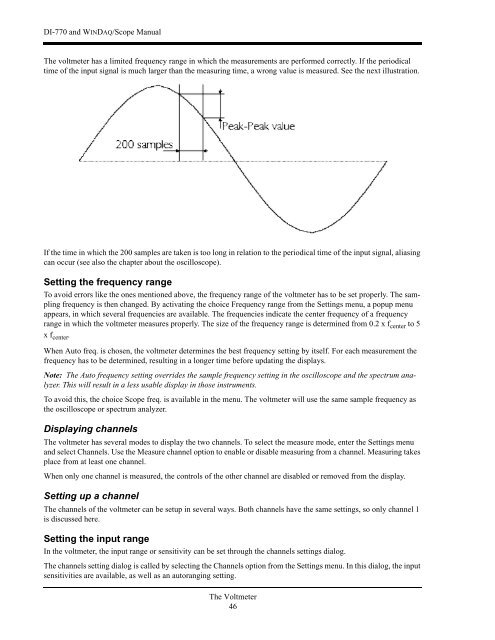
The voltmeter has a limited frequency range <strong>in</strong> which the measurements are performed correctly. If the periodical<br />
time of the <strong>in</strong>put signal is much larger than the measur<strong>in</strong>g time, a wrong value is measured. See the next illustration.<br />
If the time <strong>in</strong> which the 200 samples are taken is too long <strong>in</strong> relation to the periodical time of the <strong>in</strong>put signal, alias<strong>in</strong>g<br />
can occur (see also the chapter about the oscilloscope).<br />
Sett<strong>in</strong>g the frequency range<br />
To avoid errors like the <strong>one</strong>s menti<strong>one</strong>d above, the frequency range of the voltmeter has to be set properly. The sampl<strong>in</strong>g<br />
frequency is then changed. By activat<strong>in</strong>g the choice Frequency range from the Sett<strong>in</strong>gs menu, a popup menu<br />
appears, <strong>in</strong> which several frequencies are available. The frequencies <strong>in</strong>dicate the center frequency of a frequency<br />
range <strong>in</strong> which the voltmeter measures properly. The size of the frequency range is determ<strong>in</strong>ed from 0.2 x f center to 5<br />
x f center .<br />
When Auto freq. is chosen, the voltmeter determ<strong>in</strong>es the best frequency sett<strong>in</strong>g by itself. For each measurement the<br />
frequency has to be determ<strong>in</strong>ed, result<strong>in</strong>g <strong>in</strong> a longer time before updat<strong>in</strong>g the displays.<br />
Note: The Auto frequency sett<strong>in</strong>g overrides the sample frequency sett<strong>in</strong>g <strong>in</strong> the oscilloscope and the spectrum analyzer.<br />
This will result <strong>in</strong> a less usable display <strong>in</strong> those <strong><strong>in</strong>struments</strong>.<br />
To avoid this, the choice Scope freq. is available <strong>in</strong> the menu. The voltmeter will use the same sample frequency as<br />
the oscilloscope or spectrum analyzer.<br />
Display<strong>in</strong>g channels<br />
The voltmeter has several modes to display the two channels. To select the measure mode, enter the Sett<strong>in</strong>gs menu<br />
and select Channels. Use the Measure channel option to enable or disable measur<strong>in</strong>g from a channel. Measur<strong>in</strong>g takes<br />
place from at least <strong>one</strong> channel.<br />
When only <strong>one</strong> channel is measured, the controls of the other channel are disabled or removed from the display.<br />
Sett<strong>in</strong>g up a channel<br />
The channels of the voltmeter can be setup <strong>in</strong> several ways. Both channels have the same sett<strong>in</strong>gs, so only channel 1<br />
is discussed here.<br />
Sett<strong>in</strong>g the <strong>in</strong>put range<br />
In the voltmeter, the <strong>in</strong>put range or sensitivity can be set through the channels sett<strong>in</strong>gs dialog.<br />
The channels sett<strong>in</strong>g dialog is called by select<strong>in</strong>g the Channels option from the Sett<strong>in</strong>gs menu. In this dialog, the <strong>in</strong>put<br />
sensitivities are available, as well as an autorang<strong>in</strong>g sett<strong>in</strong>g.<br />
The Voltmeter<br />
46