DI-770 Oscilloscope provides five virtual instruments in one
DI-770 Oscilloscope provides five virtual instruments in one
DI-770 Oscilloscope provides five virtual instruments in one
Create successful ePaper yourself
Turn your PDF publications into a flip-book with our unique Google optimized e-Paper software.
<strong>DI</strong>-<strong>770</strong> and WINDAQ/Scope Manual<br />
Cont<strong>in</strong>uous measur<strong>in</strong>g can be switched on by activat<strong>in</strong>g the play button or press<strong>in</strong>g the key.<br />
Stor<strong>in</strong>g measurement values on disk or paper<br />
The voltmeter can store measurements on disk or pr<strong>in</strong>t them. This is d<strong>one</strong> <strong>in</strong> a completely different way than the other<br />
<strong><strong>in</strong>struments</strong>.<br />
The voltmeter can be set to measure (acquire) at fixed times. The measured value will then be stored on disk or sent<br />
to the pr<strong>in</strong>ter.<br />
The time at which measurements are taken is not 100% guaranteed. The reason for this is the W<strong>in</strong>dows environment<br />
which is not a real-time multitask<strong>in</strong>g system. Because of this there is no guarantee that the time between two measurements<br />
is the set <strong>in</strong>terval. If this occurs, close all w<strong>in</strong>dows programs except the voltmeter and then try aga<strong>in</strong>.<br />
Sett<strong>in</strong>g the time between two measurements<br />
By activat<strong>in</strong>g the choice Time from the Acquisition menu, the time between two measurements can be set. A dialog<br />
box appears <strong>in</strong> which the time <strong>in</strong> seconds can be entered.<br />
Note: When a time shorter than 0.5 seconds is entered, the acquisition speed is determ<strong>in</strong>ed by the changes of the displays.<br />
Sett<strong>in</strong>g the hysteresis<br />
With an acquisition time smaller than 0.5 seconds, the acquisition speed is determ<strong>in</strong>ed by the changes <strong>in</strong> the displays.<br />
It can occur that the <strong>in</strong>put signal has a value just between two displayable values. In that case the display will constantly<br />
change between the two values. To avoid a constant storage to disk or pr<strong>in</strong>ter <strong>in</strong> that case, a hysteresis can be<br />
set. Only when the <strong>in</strong>put value change exceeds the hysteresis value, the <strong>in</strong>put value will be stored.<br />
By activat<strong>in</strong>g the item Hysteresis from the Acquisition menu, a dialog appears <strong>in</strong> which the hysteresis can be entered.<br />
The hysteresis is entered as a percentage of the last measured value. With each new measurement, the size of the hysteresis<br />
<strong>in</strong> volts is recalculated.<br />
The hysteresis can only be set with an acquisition time smaller than 0.5 seconds.<br />
Start an acquisition<br />
By activat<strong>in</strong>g the choice Write data from the Acquire menu, a menu is shown with which a selection can be made to<br />
write to disk or pr<strong>in</strong>ter.<br />
The choice Disk will cause the measurement data to be stored on disk. After activat<strong>in</strong>g the choice, a save dialog<br />
appears <strong>in</strong> which the drive, directory and name of the file can be typed. If the typed file already exists, an overwrite<br />
prompt will appear. The measur<strong>in</strong>g will start after this. At fixed times a measurement is taken and stored on disk.<br />
Measur<strong>in</strong>g can be aborted by press<strong>in</strong>g the cancel button.<br />
The choice Pr<strong>in</strong>ter will cause the measurement data to be written to the pr<strong>in</strong>ter. After activat<strong>in</strong>g the choice, a pr<strong>in</strong>t dialog<br />
appears from which a pr<strong>in</strong>ter can be selected. A dialog will appear <strong>in</strong> which the title of the job can be typed. Now<br />
measur<strong>in</strong>g starts. At fixed times a measurement is taken and sent to the pr<strong>in</strong>ter. Measur<strong>in</strong>g can be aborted by press<strong>in</strong>g<br />
the Cancel button.<br />
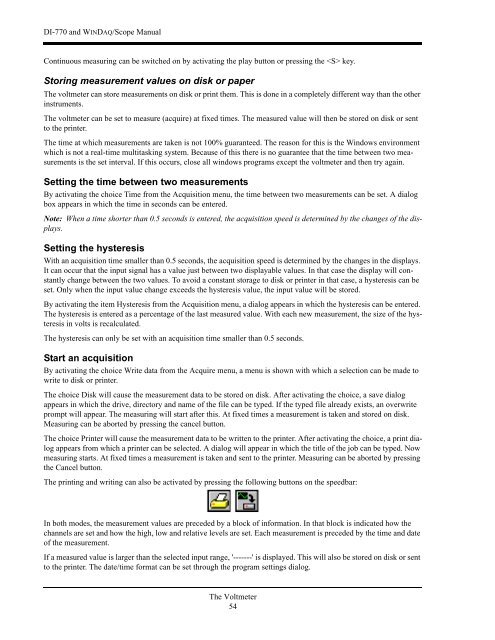
The pr<strong>in</strong>t<strong>in</strong>g and writ<strong>in</strong>g can also be activated by press<strong>in</strong>g the follow<strong>in</strong>g buttons on the speedbar:<br />
In both modes, the measurement values are preceded by a block of <strong>in</strong>formation. In that block is <strong>in</strong>dicated how the<br />
channels are set and how the high, low and relative levels are set. Each measurement is preceded by the time and date<br />
of the measurement.<br />
If a measured value is larger than the selected <strong>in</strong>put range, '-------' is displayed. This will also be stored on disk or sent<br />
to the pr<strong>in</strong>ter. The date/time format can be set through the program sett<strong>in</strong>gs dialog.<br />
The Voltmeter<br />
54


