SolarEdge
SolarEdge Installation Guide â MAN-01-00057-2.3
SolarEdge Installation Guide â MAN-01-00057-2.3

Create successful ePaper yourself
Turn your PDF publications into a flip-book with our unique Google optimized e-Paper software.
Chapter 3: Installing the Inverter<br />
Chapter 3: Installing the Inverter<br />
Install the inverter either before or after the modules and power optimizers have been<br />
installed.<br />
CAUTION!<br />
Do not rest the connectors at the bottom of the inverter on the ground, as it may damage<br />
them. To rest the inverter on the ground, lay it on its back, front or side.<br />
Inverter Package Contents<br />
• One <strong>SolarEdge</strong> inverter<br />
• One mounting bracket<br />
• Two Allen screws for fastening the inverter to the mounting bracket<br />
• installation guide (with activation card and instructions)<br />
Identifying the Inverter<br />
Refer to the sticker on the inverter that specifies its Serial Number and its Electrical Ratings.<br />
Provide the serial number when contacting <strong>SolarEdge</strong> support. The serial number is also<br />
required when opening a new site in the <strong>SolarEdge</strong> monitoring portal.<br />
In the following sections, unless otherwise indicated, instructions apply to both single-phase<br />
and three-phase inverters, though only one graphical example may be presented.<br />
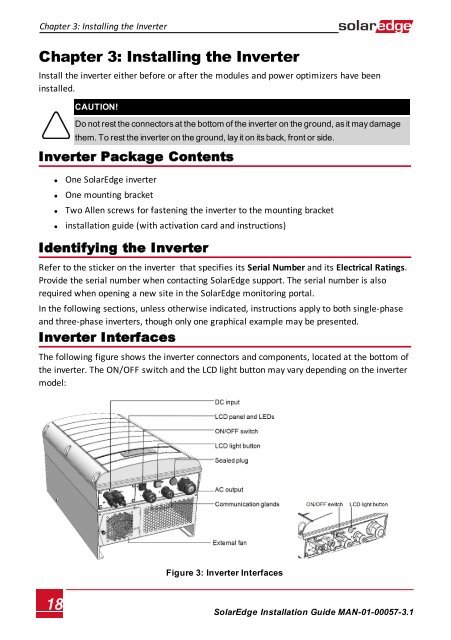
Inverter Interfaces<br />
The following figure shows the inverter connectors and components, located at the bottom of<br />
the inverter. The ON/OFF switch and the LCD light button may vary depending on the inverter<br />
model:<br />
Figure 3: Inverter Interfaces<br />
18<br />
<strong>SolarEdge</strong>-Installation Guide MAN-01-00057-3.1