SolarEdge
SolarEdge Installation Guide â MAN-01-00057-2.3
SolarEdge Installation Guide â MAN-01-00057-2.3

Create successful ePaper yourself
Turn your PDF publications into a flip-book with our unique Google optimized e-Paper software.
Mounting the Inverter<br />
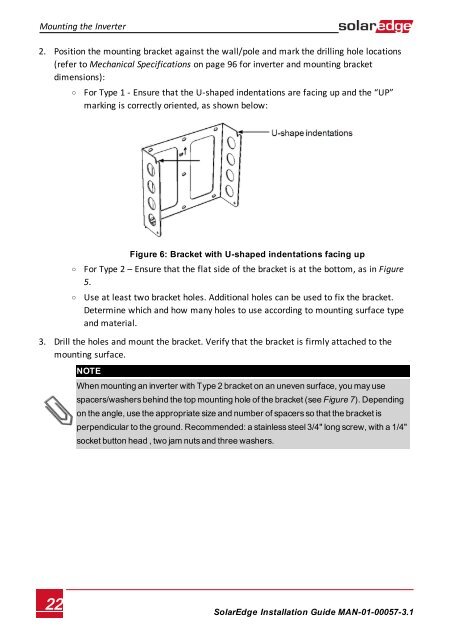
2. Position the mounting bracket against the wall/pole and mark the drilling hole locations<br />
(refer to Mechanical Specifications on page 96 for inverter and mounting bracket<br />
dimensions):<br />
o<br />
For Type 1 - Ensure that the U-shaped indentations are facing up and the “UP”<br />
marking is correctly oriented, as shown below:<br />
o<br />
o<br />
Figure 6: Bracket with U-shaped indentations facing up<br />
For Type 2 – Ensure that the flat side of the bracket is at the bottom, as in Figure<br />
5.<br />
Use at least two bracket holes. Additional holes can be used to fix the bracket.<br />
Determine which and how many holes to use according to mounting surface type<br />
and material.<br />
3. Drill the holes and mount the bracket. Verify that the bracket is firmly attached to the<br />
mounting surface.<br />
NOTE<br />
When mounting an inverter with Type 2 bracket on an uneven surface, you may use<br />
spacers/washers behind the top mounting hole of the bracket (see Figure 7). Depending<br />
on the angle, use the appropriate size and number of spacers so that the bracket is<br />
perpendicular to the ground. Recommended: a stainless steel 3/4" long screw, with a 1/4"<br />
socket button head , two jam nuts and three washers.<br />
22<br />
<strong>SolarEdge</strong>-Installation Guide MAN-01-00057-3.1